Close this window to return to series
300 project listing
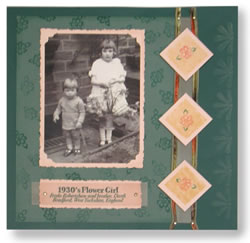
"1930's
Flower Girl" by Julie McGuffee
Mix chalks with enhancer
medium and you have a whole palette of colors for rubber stamping!
What a great way to add dimension and interest to your paper crafting
projects.
Materials
Needed
Craf-T Products Chalks and Applicators
Craf-T Products Enhancing Medium
Fiskars Paper Trimmer
Fiskars Paper Edgers – Deckle
Fiskars Photo Corner Punch – Majestic
Fiskars Photo Memories Country cardstock
– Green & Tan
Fiskars Shape Boss and Square Splash
Embossing Stencil
Fiskars 1/8” Hole Hand Punch
Xyron 900 and Re-positionable Adhesive
Hot Off the Press Tan Vellum
6 Gold Brads
24’ of narrow ribbon - Adornments
12 x 12 Background cardstock
Rubber Stamps - Square and Flower
Remember to choose colors of paper and embellishments
that complement your photographs. Colors chosen here reflect the
colors and theme of my photographs, but may not be the best color
choices for yours.
Instructions
1.
Pour a little enhancer medium into the small plastic
cup. Dip the sponge applicator into the medium then mix with dark
green chalk right on the chalk palette. Tap the color onto the flower
rubber stamp. Use this to decorate the 8 x 11 green paper for a
monochromatic background.
2.
Cut three 2” tan squares. Stamp a dark yellow
square at the center of each of the tan squares. Color the leaves
green on the flower stamp and the center brick red. Stamp the design
at the center of the dark yellow square.
3.
Cut a mat from tan cardstock one half inch longer
and wider than the photograph. Punch a slot in each corner with
the photo corner punch. Trim the edges of the cardstock with the
deckle scissors to achieve the “old fashioned” look.
Place the photograph on the mat, tucking the corners into the slots.
Cut a 2” wide rectangle the same width as the photo mat. Trim
the edges with the deckle scissors
4.
Print the title information onto a strip of tan vellum
that is about half an inch narrower than the title block and 1”
longer. Center on the tan rectangle then punch a hole at the center
of each end as shown. Attach the vellum to the cardstock with brads.
5.
Arrange then glue the photo and the title on the 8
x 11 green paper. Set aside.
6.
Emboss the design along one edge of the 12 x 12 background
paper. Flip the paper and embossing stencil over then lightly color
the design with a dusting of chalk. Use a clean sponge applicator
or a small pom-pom.
7.
With the border pattern on the background paper to
the right glue the 8 x 11 sheet to the left side leaving a half
inch border at the top, bottom and left side. Cut a strip of vellum
11” long and 1” wide. Place over the right edge of the
8 x 11 paper then secure at the top and bottom with brads. Lay a
strip of narrow ribbon over each edge then secure with the same
brads.
8.
Attach the 3 squares with foam dots for added dimension.
TIP:
Since this was a one-of-kind vintage photograph, I
made a copy of it on the Kodak Picture Maker to use on my scrapbook
page.