Close this window to return to series
400 project listing |
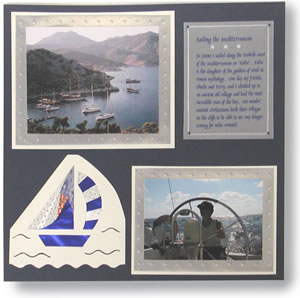
| “Sailing
the Mediterranean” |
| |
| Materials
Needed |
 |
| |
 |
Iris Folding Book (IVT 203) |
| |
|
Iris Folding Paper (IVP 2034) |
| |
|
Background Template (AE1208) |
| |
|
Pergamano Fantasy Vellum Lilac (1608) |
| |
|
Pergamano Parchment Vellum (1406) |
| |
|
Medium embossing tool (1101) |
| |
|
Ivory Card stock (K2900-22) |
| |
|
Blue 12 x 12” Card Stock |
| |
|
Holographic paper or ribbon |
| |
|
Hobby knife |
| |
|
Cutting Mat |
| |
|
4 blue beads optional |
| |
|
cello-tape |
| |
| Instructions |
| Iris Folding Sailboat |
| |
1. |
Trace the outline of the pattern onto card stock
using a light box. The sailboat pattern is also available in a die
cut card or a mylar template is also available to help trace the
design. |
| |
2. |
Cut out the outline of your design in your card stock
using a hobby knife. Use a metal ruler to ensure straight edges
as indicated. |
| |
3. |
Cut the bottom edge in a wave pattern using the background
template AE1208. Tape the template to the card and cut the wave
pattern in the template using a hobby knife. |
| |
4. |
Cut similar wave patterns around the boat using the
template as desired. |
| |
5. |
The example also cut the card stock to mimic the
sailboat ie. straight edge at the back and curved edge at the front. |
| |
6. |
Choose 3 different coordinating papers from the Iris
Folding Papers IVP 2034. The example used a bright blue foil, a
silver foil with stars and a patterned blue paper. |
| |
7. |
Cut 2.5 cm or 1” paper strips of each color |
| |
8. |
Fold your paper strips in half (length-wise) with
the color to the outside. |
| |
9. |
Place your cut out card on top of your pattern front
side down. |
| |
10. |
Decide the order in which you wish to place your
paper strips (i.e. what color will lie against another color.) |
| |
11. |
Place a piece of blue foil over the bottom of the
boat. |
| |
12. |
Next complete the front sail by alternating blue
foil with the silver foil. (The pattern indicates 3 alternating
colors for the sail however, the example only used two). Place the
folded edge of each paper strip against the line, cut to size and
tape in place. |
| |
13. |
To complete the main sail, start at #1, take a blue
foil strip and place the folded edge along line #1. Cut to size…leaving
a small amount at each edge to overlap the card stock and tape in
place using cello tape. |
| |
14. |
Take a silver foil paper strip and place the folded
edge along line #2, cut to size and tape in place. |
| |
15. |
Take a patterned blue paper strip and place the folded
edge along line #3. |
| |
16. |
The next colored paper strip will be the same as
you used for #1, the following one will be the same as #2 etc. |
| |
17. |
Continue rotating the colored paper strips in the
same manner until you have filled in all of the numbers. |
| |
18. |
Over the center hole place a fancy piece of foil
or holographic paper to accent your design. |
| |
19. |
Attach your design to the memory page using double-sided
tape. |
| |
Embossed
vellum frames: |
| |
1. |
Each of the pictures is framed with a bottom layer
of ivory card stock and an upper layer of fantasy parchment paper
in a light blue shade. |
| |
2. |
Cut your frames to size as desired. |
| |
3. |
Emboss the blue vellum with stars using the background
template AE1208. To emboss the vellum place it front side down on
the template on your cutting mat. |
| |
4. |
Adjust the vellum so that there will be a straight
line of stars at the top of the frame. Press the vellum into the
template using a medium embossing tool. The vellum will turn white
as it is embossed. Emboss the row of stars move your template, realign
and then emboss the remaining stars along the top (that is if your
frame is larger than the template). Next using the corner star as
a guide place in the upper star and then emboss single stars down
the edge of the frame until you reach the bottom. Then emboss the
bottom row as you did the top row and finally the other side. |
| |
5. |
Attach the vellum to the ivory card stock with Zig
glue in the corners and double-sided tape in the middle that will
be covered with the photograph. |
| |
6. |
Attach the photograph to the vellum with double sided
tape and finally the ivory card stock to the memory page. |
| |
Journaling: |
| |
1. |
The journaling in the example was printed in dark
blue ink on Pergamano parchment vellum (1406) using an ink jet printer. |
| |
2. |
The vellum was embossed with three small stars using
the background template (AE1208) |
| |
3. |
Place your printed vellum front side down on the
template on your cutting mat. |
| |
4. |
Center the stars as desired and then press the vellum
into the template using a medium embossing tool. The vellum will
turn white as it is embossed. Emboss three small stars. |
| |
5. |
Attach the journaling to the memory page with 4 small
blue beads. Place your journaling in the desired position then make
a small hole in the vellum design and memory page using Erica’s
very fine piercing tool. This tool creates a tiny hole that will
be fully covered by the bead. |
| |
6. |
Thread a needle with a matching color of thread as
the bead or to match the design. Use a double strand and tie a knot
in the end. Cut off any excess thread. |
| |
7. |
From the back pull the needle and thread through
the hole and the vellum, push the design down against the hole.
Now place a bead on the needle and move it down onto the thread.
Take your needle and go back down through the same hole you came
up through. (Do Not go down though the bead again). The bead will
prevent the thread from coming out again and hold the journaling
in place. |
| |
8. |
When you have attached the bead then you need to
once again knot the end. Try to have a long enough piece of thread
then tie a knot in the thread and then using Erica’s very
fine piercing tool, guide the knot to tighten below the initial
knot. Tie a few knots in this manner then cut the thread close to
the last knot. |
| Sponsor:
Ecstasy Crafts |