Close this window to return to series
400 project listing
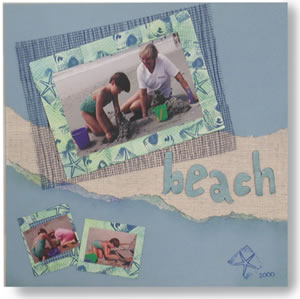
“Beach”
by: Lynn Krucke
Materials
Needed
Quick frames en blanc-(Magenta)
12 x 12 cardstock- cream, med. blue
Maruyama mesh paper- dark blue nest,
sky blue mesh (Magenta)
Decorating chalks- kit #1 (Craf-T Products)
Stylus handle (Colorbox)
Moldable Black tips- lg. square (Colorbox)
Ancient Page inkpad- cobalt, harbor
(Colorbox)
Premo polymer clay- pearl, cobalt blue,
and scraps (Polyform)
Acrylic roller or pasta machine
Metallic Rub-Ons- Kit #1 (Craf-T Products)
Lamp with 75 watt bulb
Shells, assorted
Baby powder
Scissors
Craft knife
Paper trimmer
Photographs (or color copies)
Tape runner
Glue Dots
Instructions
Preparing
the clay elements
1.
Mix approximately 1 part cobalt blue clay with 6
parts pearl clay to make a medium blue.
2.
Roll blue clay out into a sheet about 1/16 inch thick.
Place a piece of maruyama mesh on top of the clay sheet and roll
over it with the acrylic roller to texture the clay.
3.
Use a craft knife to cut out letters freehand. Bake
at 275 degrees F for thirty minutes.
4.
Roll scrap clay into a sheet about 1/8 inch thick.
Dust the surface of the sheet liberally with baby powder.
5.
Press shells into the sheet to transfer textures.
Remove the shells and press a scrap of mesh onto the sheet of clay.
Bake this texture sheet at 275 degrees F for thirty minutes.
Decorating
the blank frames
1.
Use a cotton ball to spread several shades of blue
and green chalks over the blank frames.
2.
Attach a black moldable tip to the stylus handle.
Hold it over a 75 watt light bulb for 15-20 seconds, then quickly
press the black foam onto the clay texture plate and hold in place
until cool. Heat the second tip and press onto a scrap of maruyama
mesh to create a second stamp.
3.
Use cobalt and harbor Ancient Page inks and the stamps
created in Step 2 above to stamp the chalked frames.
Assembling
the page
1.
Cut the light blue maruyama mesh sheet in half and
position it on the middle of the cream cardstock.
2.
Tear the blue cardstock in half and chalk the white
edges. Adhere the blue pieces over the top and bottom edges of the
light blue mesh. Trim excess blue cardstock.
3.
Cut a large rectangle of dark blue maruyama paper
and adhere to the page.
4.
Position the largest of the rectangle frames over
the 4 x 6 inch focal photo and place on top of dark blue mesh.
5.
Place smallest pair of rectangle frames over dark
blue mesh and add small photos.
6.
Adhere baked clay letters to the mesh at the center
of the page.