Cut pink cardstock as follows: 4.5 x 8.5 inch (1
piece), 2 x 12 inch (1 piece).
2.
Chalk 4.5 x 8.5 inch pink rectangle with several
shades of pink and purple chalks to add depth. Highlight edges with
silver metallic rub-ons.
3.
Load jumbo Rollagraph handle with embossing ink cartridge
and “shoes” wheel. Roll wheel on scratch paper to ink
image, then roll wheel along the 2-inch piece of pink cardstock
(the image will be difficult to see).
4.
Pick up pink or purple chalk on the cotton ball and
gently rub the cotton ball along the stamped image. The chalks will
stick to the embossing ink, making the image visible. Use one or
several shades of chalk to completely “reveal” image.
5.
Buff image with soft cloth or tissue to remove excess
chalk.
6.
Condition pearl Premo polymer clay and mold two embellishments
with the Victorian-themed push mold.
7.
Add chalk and silver rub-ons to the unbaked embellishments
to highlight details. Bake the embellishments at 275 degrees F for
thirty minutes then allow to cool.
8.
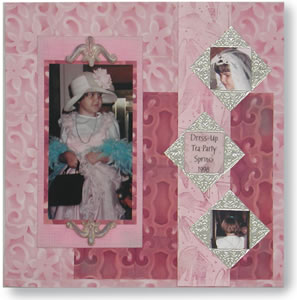
Mount large rectangle of “rose lace”
paper on 12 x 12 sheet of “pink trellis”. Mount focal
photo on “rose lace” rectangle then on cardstock prepared
in Step 2 above, then add to page. Adhere baked clay embellishments
at top and bottom of photo.
9.
Mount strip with chalked “shoes” approximately
2 inches from right edge of page.
10.
Crop remaining photos and title (Inkster font on
vellum) to 1.75 inches square and adhere to page.
11.
Use scissors to cut “classic corners”
apart. Instead of using them as photo corners, mount them “backward”
on page so that they form frames for each small photo and for the
title block.