Close this window to return to series
400 project listing |
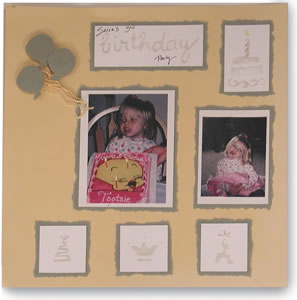
| 3RD
BIRTHDAY PARTY By Jennifer Dammann |
| Materials
Needed |
 |
| |
 |
Fiskars:
MiniBoss
MiniBoss Stencil Set – Birthday Wishes
Paper Trimmer
Scissors
Photo Stickers |
| |
|
12” X 12” Scrapbook paper
– butter yellow |
| |
|
Cardstock paper – sage, white |
| |
|
Decorating chalk – sage, yellow |
| |
|
Craft fibers – butter yellow |
| Instructions |
| |
1. |
Insert sage paper between stencils on ShapeBoss tray.
Emboss 3 balloon shapes onto paper. Trim around each shape using
scissors. |
| |
2. |
Cut (3) pieces of white cardstock paper to measure
2” X 2”. Insert each square between stencils. Emboss
different birthday hat onto each square. Remove squares and one
stencil to use as chalking stencil. Lightly chalk each hat shape
using sage chalk. Adhere each square onto sage cardstock. Tear sage
cardstock around each square, creating approximately a ½”
torn border. |
| |
3. |
Cut a piece of white cardstock to measure 2”
X 2-3/4”. Insert between stencils, then emboss cake, candle
and scrolly shape onto cardstock piece. Remove piece from stencils,
then using as chalking stencil, chalk cake, scrolls and candle with
sage chalk. Chalk candle flame using yellow chalk. Adhere this piece
to sage cardstock. Tear around white piece, leaving approximately
a ½” torn border. |
| |
4. |
Trim each photo to desired size. Adhere each photo
to white cardstock. Trim white cardstock around photo, leaving approximately
a ½” border around photo. NOTE: as an option, trim
photo mat so left and right sizes are wider than top and bottom,
or vice versa. For each photo, tear sage cardstock around white
cardstock piece, leaving approximately a ½” torn border. |
| |
5. |
Cut a piece of white cardstock to measure 4-1/2”
X 1-3/4”. Insert this piece between stencils on tray, then
emboss word “birthday” onto this piece. Remove one stencil
and use an chalking stencil. Chalk the word birthday using sage
chalk. |
| |
6. |
Journal child’s name, birthday number and the
word “party” onto this piece. Adhere this piece to sage
cardstock. Tear sage cardstock around white piece, leaving approximately
a ½” torn border. |
| |
7. |
Cut 3 strands of craft fibers to measure approximately
9”. Adhere one photo sticker to backside of each balloon.
Adhere one string to backside of each balloon. Adhere balloons in
cluster to upper left corner of page. Using extra strand of fibers,
tie balloon strings together. |
| |
8. |
Adhere rest of page pieces using photo stickers. |
| Sponsor:
Fiskars |
|