Close this window to return to series
400 project listing
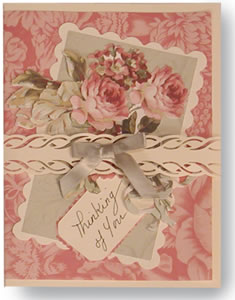
Card
Band By Julie McGuffee
Handmade cards are a great way to use
up all your leftover scraps of paper, etc. and are easy to make.
For that special touch of elegance, add a decorative band to each
card using a border punch.
Materials
Needed
Fiskars Border Punch – Rope
Fiskars Photo Memories Cardstock –
Cream
Fiskars Micro Tip Scissors
Fiskars Tag Template
Fiskars Shape Cutter
Fiskars Paper Edgers – Scallop
Fiskars Paper Edgers – Mini Scallop
Fiskars Hole Punch
Fiskars Paper Trimmer
Scraps of decorative papers (Anna Griffin
papers used in project shown)
Anna Griffin Die Cut Roses
Xyron 900 Machine and re-positionable
adhesive cartridge
Small bow
Instructions
1.
Use a purchased card or make your own. This 5”
x 7” card was made by scoring a line down the center of a
10” x 7” piece of cream colored cardstock then folding
it in half.
2.
Cut a piece of patterned paper 9.5” x 6.5”.
Center then glue to the front of the card.
3.
Cut a second piece of patterned paper 3” x
5”. Glue to cream colored cardstock then trim around the edge
with the decorative, Scallop scissors. Glue to the front of the
card.
4.
Punch the die cut flowers from the card. Arrange
then glue on top of the decorative panel on the front of the card.
5.
Use the shape cutter and template to cut a small
tag from cream colored paper. Glue to a complementary patterned
paper then trim around the edge with the Mini Scallop decorative
scissors. Punch a hole at the top of the tag. Write “Thinking
of You” on the tag or another greeting of your choice. Use
word stickers if desired. Set aside.
6.
Cut a strip of cream colored paper 11” x 1
3/4” wide. Mark the center of the strip. Slide the strip into
the border punch aligning the center with the center mark on the
punch. (This is a small notch at the front of the punch –
see photo.) Punch once then two more times at each side of the center
punch aligning the pattern as you punch. Turn the strip OVER then
punch the opposite side in the same manner. There will be a short
strip left unpunched at each end. Trim away the solid strip above
the design.
7.
Center the strip across the front of the card. Fold
ends to the back. Overlap then glue ends together. Do not glue the
band to the card; it should be removable.
8.
Glue bow to the center of the band. The tag can be
glue to the front of the card, attached to the band with a piece
of embroidery thread or glued to the band.
TIP:
Place the template on top of the embossed design then
chalk lightly if desired.