Close this window to return to series
400 project listing |
| “My
Favorite Garden Flowers” |
| Materials
Needed |
 |
| |
 |
Cards and Memories to Treasure EF2003
(Embroidery on Paper pattern book) |
| |
|
Fun With Paper Crafts (An idea and pattern
book) |
| |
|
Spirelli small flower punch (SP 2606) |
| |
|
Background template tulip (AE1204) (optional) |
| |
|
Erica’s Multipurpose Stencil Starlight
(EF8012) |
| |
|
Erica’s very fine piercing tool
(EF0007) |
| |
|
Erica’s coarse piercing tool (EF0009) |
| |
|
Medium Embossing tool (1101) |
| |
|
Piercing pad (1419) |
| |
|
Mint Green Card Stock (K2900-65) |
| |
|
Pergamano Parchment Vellum (1406) |
| |
|
3-D foam blocks (AV8938) |
| |
|
Light pink paper (optional) |
| |
|
2 colors of pink thread (rayon machine
embroidery thread) |
| |
|
2 colors of green thread (rayon machine
embroidery thread) |
| Instructions |
| |
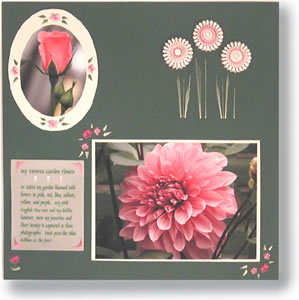
Oval Frame
for Rose Bud: |
| |
1. |
Photocopy the patterns for embroidery from the book
pages 13 and 18 from Cards and Memories to treasure. Cut an oval
out of mint green card stock. The oval used was 5 1/8” x 3
¾” or 10 x 13 cm. What I did was cut my picture to
size and then blow up that oval on the photocopier 130 X. |
| |
2. |
Mark the center of the top, bottom and sides of the
oval. Use the pattern with the single flower and double leaves from
the top of the oval on page 18. Cut out this pattern from the page
(ie. a small square around the pattern) and place on top of the
card stock centering the flower with the center you marked at the
top of the oval. Tape the pattern in place with cello-tape. |
| |
3. |
Place the oval on top of your piercing pad. Pierce
all of the small dots with Erica’s very fine piercing tool
and the larger dots (centers of the flowers and bottom of the leaves)
with the coarse piercing tool. Hold you piercing tool at a 90-degree
angle to ensure evenly pierced holes and pierce through the photocopy
into the card stock. |
| |
4. |
Repeat step 3 for the bottom of the frame. |
| |
5. |
Cut out a single flower from the circular frame on
page 13 and place on top of the card stock centering the flower
with the center you marked at the side of the oval. Tape the pattern
in place with cello-tape. |
| |
6. |
Pierce the pattern into the card stock using Erica’s
piercing tools as in step #3. |
| |
7. |
Select your colors of thread to use for the embroidery.
The example used a medium color rayon pink thread for the flowers
and a dark green for the leaves. |
| |
8. |
Thread a small needle (the eye of the needle must
be as small as possible to move easily through the holes. Use a
needle threader if you need assistance in threading the needle.
Use a double strand of rayon thread. |
| |
9. |
Take your needle from the back of the frame through
the center of one of the flowers to the front of the frame. Tape
the end of the thread to the back of the oval frame. Now take your
needle and thread and go down through any one of the holes you pierced.
Come back up through the center of the flower and then go down through
the hole next to your first thread. Continue in this manner until
you have completed your flower. Tape the end of your thread to the
back of the frame. |
| |
10. |
Thread another needle of the same needle with dark
green thread and embroider the leaves in the same fashion. That
is bring your needle and thread from the back of the card stock
to the front through the larger hole at the bottom of the leaf.
Take your needle down through the adjacent hole either on the right
or left of the bottom hole. Come back up through the bottom hole
and then go down through the next adjacent hole. Continue in this
manner until the leaf is complete. If you have thread left then
just move to the next bottom hole of a leaf and embroider that leaf
until all four leaves are complete. |
| |
11. |
Embroider the remaining flowers and leaves on the
frame in the same satin stitch. |
| |
12. |
Attach the photo to the center of the frame using
double-sided tape.
|
| |
Corner
Frame Flowers: |
| |
1. |
The corner frame flowers are taken from page 18
in Cards and Memories to Treasure. Photocopy the pattern and then
cut out one of the corner patterns. Determine where the corners
will be placed on your 12” x 12” green sheet. (I marked
the corners of the mint green frame in pencil onto the card stock
to use to align the corner flower pattern).
|
| |
2. |
Pierce the corner flowers and leaves into the
dark green card stock using Erica’s very fine and coarse
piercing tools. |
| |
3. |
Embroider the flowers and leaves as per the instructions
for above for the Rose Bud frame. For these corners the example
used a mint green thread for the leaves and a dark and medium
pink for the flowers. |
| |
4. |
Attach the a mint green background sheet to the
card stock with double-sided tape and then tape the photograph
in place. |
| |
Spirelli
Flower Bouquet and Single Flower in Bottom Corner:
|
| |
1. |
Punch out; 3mint green card stock, and 3 light
pink paper small flowers using Spirelli punch SP2606. |
| |
2. |
Photocopy the flower stem pattern and single flower
patter from Fun with Paper Crafts Chapter “Friends and Flowers”.
|
| |
3. |
Cut the flower stems pattern out of the photocopy
and place just above the bottom picture. Pierce the flower stems
pattern using the Erica’s very fine and coarse piercing
tools. |
| |
4. |
Embroider the stems using mint green thread. |
| |
5. |
Attach the three pink paper punched flowers just
above the embroidered stems on the right and left sides and in
the center using double-sided tape. |
| |
6. |
To complete your Spirelli designs follow these
instructions: Tape your thread to the back of your Spirelli flower
and then count the number of petals you wish to skip. Wind the
thread in the space between the petals you desire, winding the
thread around the back of the Spirelli flower coming up between
the petals to the right of where you started. Now cross the thread
over your previous thread and place in the space between the petals
to the left of the previous thread. Wind the thread around the
back of the Spirelli shape and come up between the points to the
right of your last thread. Repeat the above two steps until you
have completed your design. |
| |
7. |
The Spirelli flowers on this page use multiple
layers to create a beautiful string art effect. Follow the above
instructions for each layer taping the ends to the back of your
flower over the previous threads. |
| |
8. |
The middle flower has three layers of threads.
The first layer uses light pink thread skipping 10 petals; the
second layer uses medium pink thread skipping 8 petals and the
third layer uses dark pink thread skipping 7 petals. |
| |
9. |
The right flower has two layers. The first layer
uses light pink thread skipping 10 petals; the second layer uses
medium pink thread skipping 8 petals. |
| |
10. |
The left flower has two layers. The first layer
uses dark pink thread skipping 9 petals; the second layer uses
light pink thread skipping 8 petals. |
| |
11. |
Attach each of these Spirelli designs on top of
the pink punched flowers using 3mm foam blocks to give a 3-dimensional
effect. |
| |
12. |
For the bottom corner flower use the single flower
pattern photocopied as described above. |
| |
13. |
Pierce the pattern into your card stock in the
bottom corner. Embroider the flower and leaves as described earlier
using dark pink thread for the flower and mint green thread for
the leaves and stem. |
| |
Journaling:
|
| |
1. |
The journaling in the example was printed in dark
green ink on Pergamano parchment vellum (1406) using an ink jet
printer. Two layers of vellum were used to enhance the color. |
| |
2. |
The top vellum layer was embossed with three small
flowers using the background template (AE1204) |
| |
3. |
Place your printed vellum front side down on the
template on your cutting mat. |
| |
4. |
Center the flowers as desired and then press the
vellum into the template using a medium embossing tool. The vellum
will turn white as it is embossed. Emboss three small flowers. |
| |
5. |
The journaling is attached to the memory page with
embroidered corners. Place your journaling in the desired position
and tape down to the card stock. Then using Erica’s Multipurpose
Stencil EF8012 pierce the corner pattern through the vellum into
the card stock. Pierce each corner with the same pattern. Embroider
the corners with medium pink thread as described above. For the
corner come up through the corner hole through the card stock and
two layers of vellum, and then take your thread out to each of the
holes in sequence always coming back up through the corner hole.
Gently remove the tape. |
| Sponsor:
Ecstasy Crafts |