Close this window to return to series
400 project listing |
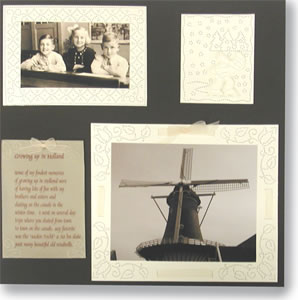
| “Growing
up in Holland” |
| Materials
Needed |
 |
| |
 |
Ornare Piercing Tool (PR 0100)
|
| |
|
Ornare Template for skater (PM 017) |
| |
|
Ornare Template Frames (PM 0553) |
| |
|
Ornare The All Occasion Card Book (55
patterns) |
| |
|
Pergamano Parchment vellum (1610) |
| |
|
3-D Foam Tape (AV 8938) |
| |
|
Piercing Pad (1419) |
| |
|
Ivory Card Stock (K2900-22) |
| |
|
Chocolate Brown 12” x 12”
Scrapbook Card Stock |
| |
|
Perga-glue (1805)
|
|
| |
|
Sheer ivory ribbon
|
|
| |
|
Double Sided Tape
|
|
| |
|
X-acto or Hobby knife |
|
| Instructions |
| |
Windmill
frame: |
| |
1. |
Photocopy 2 patterns (#53 and #55) from “The
All Occasion Card Book” on pages 46 and 47. |
| |
2. |
Determine the size of photograph you wish to use
for the bottom corner of the page. The example shows a 12.5 x 15.5
cm or 4 7/8 x 6 1/8 inch photo with a 16 x 19 cm (7 ½ x 6
3/8 inch) frame. |
| |
3. |
Place the ivory frame front side down on your piercing
pad and align pattern #53 in one of the corners and tape with cello
tape to the card stock. You will want to remove this tape so use
tape that is easily removed. Pierce the entire corner pattern. Hold
your card stock up to the light to ensure that you have pierced
the entire pattern. Remove the pattern from the card stock. |
| |
4. |
Repeat step 3 for each of the corners of the frame. |
| |
5. |
Optional: Cut small 1 cm slits into the spaces between
the pierced patter and weave ivory ribbon through each slit. Attach
the ribbon to the back of the frame. At the top of the frame tie
a bow. |
| |
Skater: |
| |
1. |
Pierce the pattern from Template PM 017 for the
skater. Carefully cut around the skater with scissors. Cut out
the small areas between the skater’s legs and blades of
the skates. Place aside.
|
| |
2. |
Pierce the pattern for behind the skater from
the same template. The example pierced the trees and snowflakes
above and around the skater (do not pierce the inner square frame)
and as far left of the skater as the path on the ice from the
skates. Also pierce the outer frame as far as you have pierced
the skating pattern. Remove the template.
|
| |
3. |
Align the template with the pierced outer edge
so that you are able to pierce the remainder of frame. You may
overlap some of the design to ensure it is evenly aligned. Pierce
the remainder of the outer frame. Using the snowflakes on the
template, pierce several snowflakes in the blank area.
|
| |
4. |
Attach the skater you cut out previously to the
background scene using 3-D foam tape blocks. Attach the foam tape
to the skater and place in the area for the skater on the background
scene. |
| |
Children’s
Frame |
| |
1. |
Using template PM0553 pierce a frame for around
the children’s picture. The template has 4 half frames which
you are able to use to make full frames. Pierce the first half
of the pattern, then using the single dot in the middle of each
frame pierce or draw a dot to assist in realigning the template.
Remove the template and then realign for the other half of the
frame.
|
| |
2. |
In the example, the children’s picture was
slightly larger than the frame. You may lengthen each side of
the frame by increasing the number of pattern repetitions. The
example used the frame on the right hand side of the template
with 4 pattern repetitions for the frame width and 7 pattern repetitions
for the length.
|
| |
3. |
When increasing the size of the frame pierce the
pattern on the template omitting the last swirls before the corners
on the free ends. Realign the template with the previous patterns
so that the corner will be in the appropriate place. Pierce the
remaining patterns and corner. |
| |
Journaling: |
| |
1. |
The journaling in the example was printed in brown
ink onto an ivory colored vellum paper (1610) using an ink jet printer.
Two layers of vellum were used to enhance the color. Both layers
were pierced together using the corner swirl from the photocopied
pattern #55. |
| |
2. |
Place the pattern on the back of the vellum in the
corner and then attach with cello tape to the vellum to ensure it
does not move. Pierce the corner of the pattern using the piercing
tool. |
| |
3. |
Repeat step #2 for each corner. Attach the vellum
to the card stock using Zig glue. |
| |
4. |
Optional: Tie a small bow out of sheer ivory ribbon
and attach to the top of your journaling with Perga-glue or other
appropriate glue. |
| Sponsor:
Ecstasy Crafts |