Acrylic roller or pasta machine
Metallic Rub-Ons- Kit #1 (Craf-T Products)
Wax or parchment paper
Embossing stylus
Scissors
Craft knife
Paper trimmer
Photographs (or color copies)
Paper tag (for template)
Ribbon
Tape runner
Glue Dots
Instructions
1.
From the “tiles in yellow” paper, cut
one 1.5 x 12 inch strip and one 1.25 x 12 inch strip.
2.
Load the jumbo Rollagraph handle with mandarin Ancient
Page ink cartridge and “flutter bugs” wheel. Prime the
stamp on scrap paper then stamp each strip.
3.
Transfer the largest square frame from the full sheet
to a piece of wax or parchment paper. Use Chalk inks and foam blender
tips to color the frame, allowing colors to overlap and blend. Add
small amounts of silver rub-ons to frame.
4.
Ink the small stamp with green Chalk ink and stamp
image several times on the frame and on a 3.5 inch square of “tiles
in yellow” paper.
5.
Condition pearl Premo and roll out a sheet approximately
1/16 inch thick. Use the tag template to cut out a tag shape from
the sheet of clay.
6.
Press “dotted tiles” metal embellishment
around the edges of the clay tag to texture it. Highlight texture
with silver rub-ons.
7.
Stamp title on unbaked clay with coal ink. Bake at
275 degrees F for thirty minutes. Allow to cool.
8.
Crop photos to 3.25 inches square and mat three photos
on orange cardstock leaving narrow border.
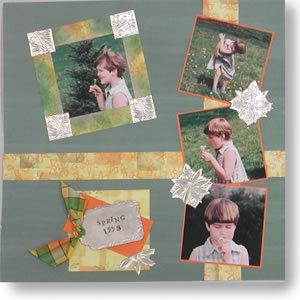
9.
Adhere stamped strips of “tiles in yellow”
to “turquoise odyssey” paper. Position wider strip about
two inches in from right edge. Place the other strip across the
page about 2/3 of the way down the page.
10.
Mount three matted photos along strip on right edge.
Position fourth photo at top left and cover with inked and stamped
frame.
11.
At bottom left, mount stamped square of “tiles
in yellow” paper with a smaller piece of orange cardstock.
Add baked clay tag and ribbon.
12.
Position “dotted tiles” self-adhesive
embellishments at corners of large frame.
13.
Use embossing stylus to texture “daisy”
embellishments around petals. Remove liner and adhere to page.
14.
With scissors, cut away background from another “daisy”
embellishment. Cut daisy in half and add to page.