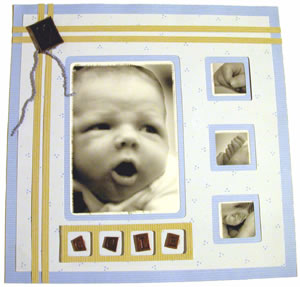
The windows on this page are designed for a 4"
x 6" photograph and three, 1.5" x 1.5" small square
photographs.
Instructions
1.
Trim 1" from the top and one side of the light
blue cardstock. Determine the placement of windows on the light
blue paper. To cut the window for the 4" x 6" photograph,
use the shape cutter and the 4.5" x 6.5" rectangle shape.
Cut a rectangle in the light blue paper. Use the squares template
to cut 2" x 2" squares for the 1.5" x 1.5" photographs.
2.
Center, then adhere the light blue sheet on top
of the medium blue sheet. Center the 4" x 6" rectangle
inside the 4.5" x 6.5" opening then cut a 4' x 6"
rectangle in the medium blue paper. Use the 1.5" square template
to cut a square inside each of the 2" squares. Place double
sided tape on the back of the page around each opening then attach
the photographs.
3.
Referring to photograph embellish the front with
narrow strips of tan cardstock. Attach the metal hand embellishment
with foam layering tape. Cut 1" square openings (one square
for each alphabet letter) in a strip of tan cardstock. Adhere with
foam layering tape. Adhere one letter inside each square with double
stick dots.