Close this window to return to series
500 project listing |
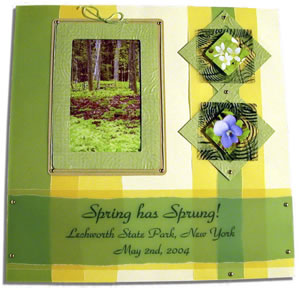
Spring
Texture
by Julie McGuffee for Fiskars |
Reminiscent of brass rubbings, texture
plates are an easy way to add dimension and texture to paper crafting
projects. |
| Materials
Needed |
 |
| |
 |
Paper:
12' x 12" Cardstock - Off White
12" x 12" Green & Yellow Pastel Vellum - Hot Off the
Press
8.5" x 11" Monochromatic Patterned Cardstock - Fiskars
Photo Memories
8.5" x 11" Acetate and light tan Cardstock |
| |
|
Tools:
Nested Squares Template - Fiskars
Nested Rectangles Template - Fiskars
Large Rectangle Templates - Fiskars
Shape Cutter - Fiskars
Craft Mat - Fiskars
1.8" Hole Hand Punch - Fiskars
Fern Texture Plate - Fiskars
Texture Tool - Fiskars |
| |
|
Embellishments:
11 Silver Brads - American Traditional
Embroidery Floss
Moldable Foam - Clearsnap
Stayz On Black Ink |
| |
|
Adhesives:
Photo Mounting Squares, Foam Mounting Tape, Double Sided Photo Tape,
Vellum tape, Foam Layering Tape - 3M |
| |
| Instructions |
| |
1. |
To make the border along the left side of the page,
tear two strips of yellow vellum, one about 5" wide and one
about 4" wide and a green strip about 3" wide. Layer strips
on top of each then attach to the background paper with vellum tape
at the top and bottom. Tear an additional 3" wide strip of
yellow vellum then adhere to the right side of the page about 2"
from right the edge. Tear a 1" wide strip of green vellum then
layer on top of the yellow down the center. |
| |
2. |
Print or write a title on green vellum. Tear vellum
above and below. Mat with a strip of yellow vellum about 1' wider.
Place the green on top of the yellow then attach to each side
of the page about 1" from the bottom, with silver brads as
shown. Note: Punch holes for brads with the hand punch. |
| |
3. |
Using the texture plate and texture tool texturize
the surface of the green paper. Using the shape cutter and rectangle
templates, cut a 4" x 6" rectangle frame from the green
paper with a 3" x 5" opening from the nested rectangle
template. Note: Cut the inside rectangle first then the larger
rectangle. Cut two, 3" squares with 2" square openings. |
| |
4. |
Heat the moldable foam per instructions, and then
press onto texture plate. Place on ink pad then stamp design on
to acetate. Cut two, 2.5" squares from patterned acetate.
|
| |
5. |
Attach square frames together with a silver brad
then place a silver brad at opposite corners of each square. Adhere
frames on point as shown with photo mounting squares. Adhere small
photos to center of each rubber stamped acetate square with a
photo mounting square, then adhere the acetate square to the center
of the green frame with foam layering tape. |
| |
6. |
Place a silver brad at each corner of the large
rectangle frame. Adhere large photograph at the center of a 4.5"
x 6.5" rectangle of light tan paper. Position then adhere
to page with double sided tape then secure rectangle frame on
top with foam mounting tape. Starting at center top, wrap floss
around each brad. Secure ends together with a bow. |
| Sponsor:
Fiskars |
|