Close this window to return to series
600 project listing |
Winter Fun
By Diana Swensen for Fiskars |
| Materials
Needed |
 |
| |
 |
Fiskars 3” x 12” Acrylic
Ruler |
| |
 |
Fiskars Shape Cutter |
| |
|
Fiskars Shape Cutter template – Circles-1and
Tags-1 |
| |
|
Fiskars Cutting Mat |
| |
|
Fiskars Parch Amore Kit |
| |
|
Fiskars Parch Amore stencil - Snowflakes |
| |
|
Fiskars Photo tape |
| |
|
Fiskars Clear mounting stickers |
| |
|
Cardstock – Deep Icy Indigo
and Medium Icy Indigo by WorldWin Papers |
| |
|
Snowflakes stickers by PSX designs |
| |
|
Tiny Tales Quotations “Winter/Snow
by My Minds Eye Inc. |
| |
|
Watercolor Pencils by Royal Langnickel |
| |
|
White Cotton string |
| |
|
Pencil |
| |
|
Wax paper |
| |
| Instructions |
| |
1. |
Cut the color name off the bottom of the cardstock
creating a 12” x 12” page. |
| |
2. |
On the Medium Indigo cardstock draw a line down the
page 2” from
the left edge of the cardstock. Mark the following measurements
on the 2” line; 1”, 31/2”, 4 3/4”, 7
1/4”, 8 1/2”, and 11” (See diagram A)
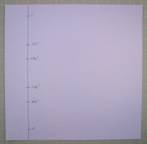
(Diagram A) |
| |
3. |
Using the Shape Cutter and the Circles-1 Template
align the gridline that runs through the middle of the 2.5” circle
with the 2” line on the page. Then center the circle
between the 3/4” and 3 3/4” marks and cut the circle
out. (See diagram B) Tip; if you start with the blade of the
Shape Cutter pointed to the inside of the circle you can avoid
any cuts in the circle frame.
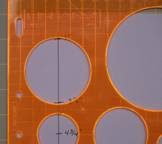
(Diagram B) |
| |
4. |
Repeat step 3 cutting out a 2.5” circle between the
4 3/4” and 7 1/4” marks and again between the 8
1/2”, and 11” marks. (See diagram C) Set cardstock
aside.
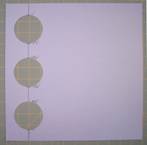
(Diagram C) |
| |
5. |
On the Dark Indigo cardstock draw a line down
the page 2” from
the left edge of the cardstock and again at 4”. Then
mark the following measurements on the 2” line; 3/4”,
3 3/4”, 4.5, 7.5, 8 1/4, and 11 1/4. (see diagram D)
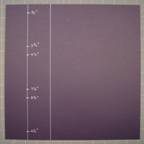
(Diagram D) |
| |
6. |
Using the Shape Cutter and the Circles-1 Template
Align the gridline that runs through the middle of the 3” circle
with the 2” line on the page. Then center the 3” circle
between the 3/4” and 3 3/4” marks and cut the circle
out. |
| |
7. |
Using the Paper Trimmer cut the cardstock along the
4” marked
line. Center and adhere the Dark Indigo circles border over the
circles on the Medium Indigo cardstock. (See diagram E)
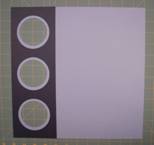
(Diagram E) |
| |
8. |
Using the Parch Amore kit and the Snowflake Stencils
follow the manufacturer’s instructions and create three individual
snowflake designs. Tips; you will need a 3.5” circle
around each snowflake so keep that in mind when you position
your parchment. You should be able to get two snowflakes on
a single sheet of parchment. (See diagram F)
(Diagram F) |
| |
9. |
Center the 3 1/3” circle from the Circles-1
template over each snowflake, mark with a pencil and cut out
with scissors. (See diagram G)
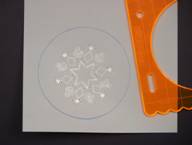
(Diagram G) |
| |
10. |
Color the back of each snowflake with colored pencils then
center a snowflake behind each circle in the border and adhere
in place. |
| |
11. |
Apply the blue border sticker along the right edge of the blue
border. (See page example. NOTE: The sticker is not quite long
enough so use a small piece of the other blue sticker border
to complete the design. |
| |
12. |
To create the letters cut 9 1” circles out
of white cardstock using the Shape Cutter and the Circles-1 Template.
Set aside.] |
| |
13. |
Using the Tags-1 Template cut 9 large circles out of dark Indigo
cardstock. |
| |
14. |
Center a white circle onto a Indigo circle and adhere in place
with Mini Pop Dots. |
| |
15. |
Repeat step 14 for the remaining 8 circles. |
| |
16. |
Apply the letters for Winter Fun to the white circle. (See
page example) Set letters aside |
| |
17. |
Using the Shape Cutter and the Super Size Square
Template #2 cut a frame out of white cardstock. Apply the snowflake
border to the edge |
| |
18. |
Turn the white frame over, measure in 3 1/8” from the
edge of the frame and mark. Then make a mark 1 1/2” on
either side of the center mark 1/4” up from the bottom
edge. Using the 1/8” hand held circle punch; punch a hole
at each marking. |
| |
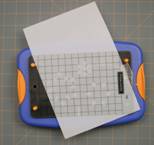
19. |
To cut the dark Indigo frame place the #3 Super Sized Square
template onto Dark Indigo cardstock. Mark the center vertical
and horizontal lines then cut out the inside square with the
Shape Cutter. Remove the #3 template and replace it with the
#5 square template making sure to align the vertical and horizontal
gridlines with the marks. Cut out the inside of the #5 Square
template. (See diagram H)
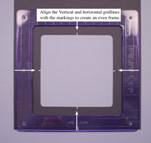
(Diagram H) |
| |
20. |
Center the dark Indigo frame over the white frame
and adhere in place. |
| |
21. |
Using the 1/8” hand held circle punch, punch
a hole in the top of the letter circles F, U, and N. Use cotton
string and hand the letters from the bottom of the square frame. |
| |
22. |
Add Photo to the frame. Center and adhere the frame
to the page. |
| |
23. |
Adhere letters “winter” to the top of
the page as shown in the example. |
| |
24. |
Cut a piece of Dark Indigo cardstock 2” x 6”.
Center and adhere the quotation sticker to the cut cardstock. Adhere
quotation to the bottom of the page as shown in the page example. |
| |
|
|
| Sponsored
by: Fiskars |