Close this window to return to series
600 project listing |
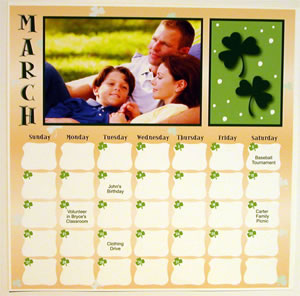
Epson Computer Tip: Making scrapbook
pages out of your monthly calendar
|
| Calendars are an item you can add to
your scrapbooks to help with the little details, that perhaps won’t
make a page on their own. There are numerous programs you can use
to make calendars or you can purchase pre-made calendars. You can
also use Microsoft Word to create a personalized calendar. |
 |
| Instructions |
| The first step is to open a Word document. The default
page size is 8-1/2 x11” which you can use or you can change
to any other side to suit your needs. We’ll make a 12”x12” calendar. |
| Open your Word document |
| Go to File/Page Setup |
| Set your margins all to ‘0’ |
| Under paper size choose “Custom Size” |
| Change your width and height both to 12 (or whatever custom
size you choose) |
| Next go to Table then Insert, and Table |
| The Insert Table box will appear, choose 7 for the number of
columns and 5 for the number rows you need for your calendar. |
| Under Auto Format you can choose different styles for your
calendar |
| After selecting OK your table will appear. Click on the resize
square at the lower right hand corner and pull the table out
to the appropriate width and length. |
| After expanding the table you will need to add Word Art so
you can add a title and the days of the week. Click on Word Art. |
| When the Word Art Gallery appears select the type of font you
would like for your calendar. |
| Inside the Word Art Text box you will choose your font type
and size, and add your text for the calendar month and days of
the week. Note: The month/year and each of the days of the week
are all separate pieces of Word Art. |
| To enter the dates for the month, simply type directly
into the table boxes. |
Once you have completed your calendar
you can use it as a template for the remaining 11 months. You
will just need to change the month by double clicking on the
current month and the Word Art Text box will appear. The monthly
dates you can just type over to coordinate with the next month.
After your calendar templates are completed you can either print
them each on Premier Art Matte Scrapbook Photo Paper from Epson,
which comes in a 12”x12” size.
If you area wanting to add clip art to your calendar prior to
printing you will first want to make sure your cursor is outside
of any of the table then:
Go to Insert/Picture/Clip Art |
| When the Clip Art box appears you will type in your theme that
you are looking for |
| Your choices will appear on the right side. Scroll through
the choices by using the bar on the right side of the box. |
| Choose your clip art and click on it to highlight it in blue,
then click on insert in the lower right hand corner |
| Once your clip art is on the page select it and on your drawing
tool bar find the Text Wrapping (little dog icon) and select
the Tight option. This will allow you to move the clip art around
and position it where you want. |
| To add more clip art just repeat the above steps
for each piece that you would like to add to your calendar. |
| |
| If you want to add a photograph you’ve
taken follow the steps for clip art, however, start by going to
Insert/Picture/File. You’ll be able to choose a photo that
you’ve take and stored on your computer or disk. |
| |
| Sponsored
by: Epson America |