1) Plan your scrapbook layout and
decide which papers and embellishments you’d like to use on your page. Decide where your journaling
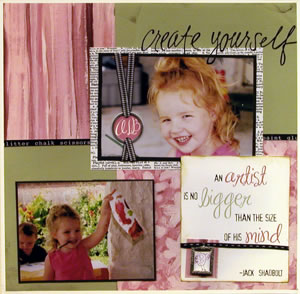
will go, and measure that space. In the case of the project shown,
the journaling will be placed in the lower right corner and measure
4” x 5”.
2) Open up PSE, and scan in the part of
your layout that has the color you want to match for your journaling.
To scan in the layout, go to File – Import.
Chose your scanner, and this will open up your scanner
driver. Make sure your resolution is set to 300 dpi. Preview
your layout, then use the marquee tool to draw a rectangle
around the area you want to scan. Now click on “Scan”.
The scan of your layout will appear in PSE, and you can
close down the scanner driver window.
3) You may choose to
match embellishments such as buttons or ribbons, cardstock,
or even a portion of the picture itself (such as someone’s
eyes or clothes).
4) The next thing to do is to create a new file
for your journaling by going to File – New.
You’ll
be prompted to name the file (i.e. “Journaling). Then
change the width to 4 inches for the project shown and height
5 inches. Change the Resolution to 300 pixels/inch
so that you can print it. Change the Mode to
RGB color. In the case of the project shown the background
is white – so
check that, too.
5) Now type your journaling by selecting the Type
Tool in
the toolbox. You can type the journaling in black initially
and then as in the project shown go back and select certain
words to change the font color. Each script-like word is
a separate layer, so that it can be moved separately. Also,
each line of text is a separate layer.
6) Next, you can
go in and change the colors of some of the words, or
all of them. First, double click on the word that you want
to change to highlight it. Then click on the Set Foreground
Color box at the bottom of the toolbox. (That will bring
up the Color
Picker Window.)
7) When you move your mouse over any
part of your workspace, the cursor changes into an eyedropper,
and you can “pick
up” the
exact color from anywhere on you layout. You can tell what color
you have picked up by looking at the 2 rectangles to the left
of the Cancel button in the Color Picker box. The top rectangle
tells you what color you have currently selected, and the bottom
rectangle is your previous color. When you have a color you like,
click OK. Now notice that your foreground color box is the color
you just picked up with your eyedropper, and your type has also
changed to that color.
8) You can change the words to different
colors with the same technique. To select a different word,
type “T” to
select the type tool again, then just double click on the word
you want to select. Click on the foreground color box to bring
up the color picker window. Then click on an element in your
layout to pick up the color from that area. When you have selected
a color you like, click OK, and then your font will be the newly
selected color.
9) Now you’re ready to print. The journaling in the project
shown was printed on a letter sized piece of paper and trimmed
it to size. Embellish your journaling however you’d like,
and adhere it to your layout. By matching your font color, your
layout looks more cohesive, and you never have to worry about finding
the perfect shade of marker again.
|