Close this window to return to series
600 project listing |
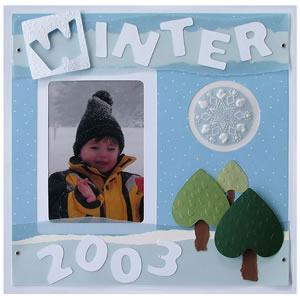
Winter
2003
By Julie McGuffee |
| Materials
Needed |
 |
| |
 |
Fiskars® Parchamoré Starter
Kit |
| |
 |
Fiskars® Parchamoré Snowflake
Stencil |
| |
|
Fiskars® Mini Shape Boss |
| |
|
Fiskars® Large Frame Templates
- Rectangles |
| |
|
Fiskars® Circles Template |
| |
|
Fiskars® Squares Template |
| |
|
Fiskars® Hearts Template |
| |
|
Fiskars® Letters Template |
| |
|
Fiskars® Texture Template -
Snowflake |
| |
|
Fiskars® Texture Tool |
| |
|
Fiskars® Shape Cutter |
| |
|
Fiskars® Self Healing Cutting
Mat |
| |
|
Fiskars® Euro Trimmer |
| |
|
Fiskars® 1/16 th Hole Punch |
| |
|
12” x 12” Cardstock – White
and Blue Patterned |
| |
|
6” x 11” Pastel Blue
Vellum |
| |
|
8 ½” x 11” Lightweight
Cardstock – White, Brown, Dark, Medium and Light Green |
| |
|
Adhesive |
| |
|
Foam Squares (3 small & 3 large) |
| |
|
4 Silver Mini Brads |
| |
Note: When choosing papers for
your layout, look for colors and styles that complement the photograph
and theme, and for solid colors which coordinate with the background
paper. |
| Instructions |
| |
1. |
Following the instructions in the Parchamoré starter
kit, emboss and pierce one Snowflake design. |
| |
2. |
Trim 1” from the bottom and one side of the
blue paper. |
| |
3. |
Cut a 5” x 7” opening in the blue paper
about 1” from
the left side centered between the top and bottom edges. Cut
a 3” circle to the right of this opening centered between
the edge of the frame and the right edge of the paper and about ½” down
from the top of the rectangle. Cut a 2 ½” circle
from this blue circle piece (or another piece of blue paper). |
| |
4. |
Center then adhere the blue paper to the white cardstock
at the corners only. Cut a 4” x 6” opening in the white
paper inside the 5” x 7” opening. This will create
a ½” white matted window for your photograph. NOTE:
Adjust the sizes of the openings to accommodate your photograph
as necessary. |
| |
5. |
Tear two, 11” strips of white cardstock about 2” – 2 ½” wide
for the bottom of the page and 1”-1 ½” wide
for the title. Tear one strip of pastel blue vellum about 2” wide
for the bottom of the page, one strip about 3” wide for
the top and the remaining strip will be for the bottom. |
| |
6. |
Use the texture plate and tool to emboss the snowflake
design onto white cardstock. Cut the letter “W” from
this piece then cut around the opening with the 2 ½” square.
Cut the remaining letters and numbers from white cardstock. |
| |
7. |
Use the back of the snowflake texture template to
emboss the design onto all three pieces of green paper, and then
cut a small, medium and large heart from different colors of green
as shown. Tear three strips of brown paper for tree trunks. |
| |
Referring to photograph, assemble the page
as follows: |
| |
8. |
Adhere the small blue circle to the center of
the white circle. |
| |
9. |
Adhere the Parchamoré snowflake in the circle
opening between the blue foreground paper and the white background.
The blue circle behind the snowflake will enhance the design. Option:
Color the back of the snowflake blue and omit the blue circle. |
| |
10. |
Title: Center the narrow, torn white strip behind
the blue vellum strip. Align with the top of the blue paper and
attach at each side with a silver brad. Use small, foam squares
to attach the letter “W” block to the left then adhere
additional letters to the strip with adhesive. |
| |
11. |
Page border (bottom): Adhere the second strip of
blue vellum over the strip of white cardstock. Attach at each end
with a silver brad. Adhere the remaining strip of blue vellum behind
the top of the white cardstock. Adhere the border to the bottom
of the page then adhere the numbers. |
| |
12. |
Use foam dots to adhere the three, green hearts to
the page as shown. Hearts are place upside down to represent trees.
Adhere a torn strip of brown paper at the base of each one for
the tree trunk. |
| |
|
|
| Sponsor:
Fiskars |