Close this window to return to series
600 project listing |
Mini
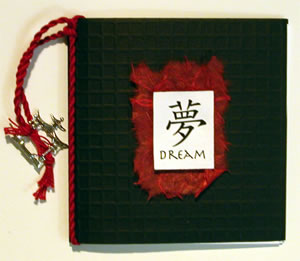
Dream Journal
By Beth Madland |
| Materials
Needed |
 |
| |
 |
Fiskars Netting Texture Plate |
| |
 |
Embossing Tool and Embossing Stylus |
| |
 |
Royal Brush Chinese Characters Rub-ons |
| |
 |
12x12 black cardstock |
| |
 |
12x12 white cardstock |
| |
 |
Red mulberry specialty paper |
| |
 |
3M Foam adhesive squares |
| |
 |
3M adhesive tape pen |
| |
 |
Red cord |
| |
 |
Charm |
| |
| Instructions |
| |
1. |
Cut a 12x12 sheet of black paper in half (12x
6). Now you have a folded 6x6 square. |
| |
2. |
Place the black paper on the netting texture plate
and rub the embossing tool on top of the paper. You will begin
to see the texture show through. Because this is a consistent pattern
you can use your stylus and follow the lines of the texture plate – this
is called blind embossing. You will have to realign your paper
on the texture plate to complete the texture on a 6x6 portion
of the black paper. I only embossed the front of this mini journal. |
| |
3. |
Select a Chinese character rub-on and cut it out.
Remove the backing sheet of the rub-on and place the rub-on onto
a sheet of white paper – a scrap piece of paper will do.
Use the Popsicle stick and rub on top of the rub-on onto the white
paper gently lifting the rub-on transfer paper. |
| |
4. |
Trim the Chinese character into a rectangle. |
| |
5. |
Tear a piece of red decorative paper larger than the Chinese
character rectangle. Use 3M adhesive on the back of the decorative
paper and place in the center of the texture side of the black
mini journal (make sure the fold of the mini journal is on the
left). |
| |
6. |
Use foam adhesive squares on the back of the Chinese character
rectangle and adhere it on top of the red decorative paper. |
| |
7. |
Insert as many white sheets of paper into the mini album. Tie
a red cord around the fold of the mini album. This will hold
the album together. Attach beads or charms to the cording. |
| |
|
|
| Sponsor:
Fiskars and
Royal Langnickel |
|