Close this window to return to series
600 project listing |
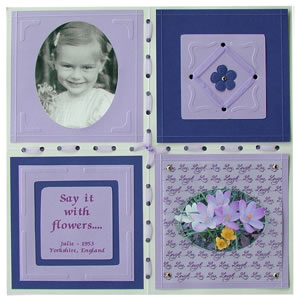
Say It With Flowers
By Julie McGuffee |
| Materials
Needed |
 |
| |
 |
Fiskars® Scrapboss with Stencil
& Stylus |
| |
 |
Fiskars® Squares Template |
| |
|
Fiskars® Ovals Template |
| |
|
Fiskars® Shape Cutter
Fiskars® Self Healing Cutting Mat |
| |
|
Fiskars® Eyelet Setter |
| |
|
Fiskars® Euro Trimmer |
| |
|
Fiskars® 1/16th” Hole Punch |
| |
|
Fiskars® Micro Tip Scissors |
| |
|
12” x 12” Cardstock –
Ivory, Pale Lavender, Blue Violet |
| |
|
Patterned Vellum |
| |
|
5 Brass Mini Brads |
| |
|
1 1/3 yd of ¼” Sheer Ribbon
- Lavender |
| |
|
Adhesive |
| |
| Note: When choosing papers
for your layout, look for colors and styles that complement the
photograph and theme, and for solid colors to coordinate with the
background paper. |
| Instructions |
| |
1. |
Using the cutting channel in the Euro trimmer
as a guide, use a stylus to dry emboss a line down the center
then across the center of the Ivory cardstock, dividing it into
four, 6” x 6” squares.
|
| |
2. |
Starting at the edge of the paper, make a mark
at every ¾” intervals along the dry embossed lines.
Use the eyelet setter to punch a hole at each marked point.
|
| |
3. |
Thread the ribbon through the holes, and then
tape the ends in place at the back. Pass the ribbon over the center
hole so that both ends will be at the back when reaching the opposite
side. Option: Twist the ribbons at the center point if desired.
|
| |
4. |
Cut the Lavender and the Blue Violet paper into
four, 6” x 6” squares. Trim two, Lavender squares
and two, Blue Violet squares to 5 ½” x 5 ½”.
Using a stylus and the cutting channel on the Euro trimmer as
a guide, dry emboss a line around these squares ¼”
from the edge. Prepare one square at a time as follows:
|
| |
a) |
Cut an oval from the center of a Lavender square
then dry emboss a photo corner design at each corner, using the
Scrapboss sampler template.
|
| |
b) |
Trim one Lavender square to measure 4 ¾”
x 4 ¾”. Dry emboss a photo corner design at each
corner, using the Scrapboss sampler template. Cut a 3 ½”
square from the center to create a frame. (This square can be
used on the second Blue Violet Square.) Cut a 3” square
around the page title. Adhere the frame and the square to the
Blue Violet square as shown.
|
| |
c) |
Dry emboss a photo corner design at each corner
of a 3 ½” square of Lavender, using the Scrapboss
sampler template. Adhere to the center of the Blue Violet square.
Dry emboss a small flower onto Blue Violet cardstock then cut
out. Attach to the center of the Lavender square with a brad at
the center. Use the Eyelet setter to make a hole at the center
of each side of the Lavender square about ½” from
the edge. Thread remaining ribbon through the holes as shown,
taping the ends to the back.
|
| |
d) |
Cut an oval at the center of the Lavender square,
large enough to accommodate the photograph. Cut a piece of printed
vellum 5” x 5”, then cut an oval from the center a
little smaller than the oval in the Lavender square. Attach the
vellum to the Lavender square by placing a brad at each corner.
|
| |
e) |
Position photographs behind the Lavender squares
then referring to photograph, attach all four squares to the Ivory
background. |
| |
|
|
| Sponsor:
Fiskars |