Close this window to return to series
600 project listing |
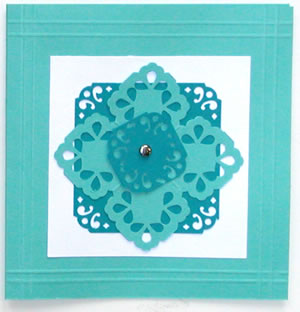
3 in 1 Decorative Doilies Card
By Julie McGuffee |
| Materials
Needed |
 |
| |
 |
Fiskars® 3in1 Corner Punch –
Lace |
| |
 |
Fiskars® Stylus |
| |
 |
Fiskars® Euro Trimmer |
| |
 |
Fiskars® 1/16th Hole Hand Punch |
| |
 |
8” x 8” Lightweight Cardstock
– White or Cream + 2 Colors |
| |
 |
Decorative and/or Colored Brads –
Making memories |
| |
 |
3M Adhesive |
| |
| Instructions |
| |
1. |
To make the basic card, cut one 8x8 piece of
card stock in half. Using a stylus and the cutting channel in
the paper trimmer as a guide, score a line across the center of
the strip. When folded this will create a 4 x 4 card.
|
| |
2. |
On all four sides of the front of the card, score
two lines 1/8” apart, ¼” from the edges (and
center fold) of the card. |
| |
3. |
Cut a 2 ¾” square from either white
or off white cardstock then adhere to the center front of the card,
within the embossed lines. |
| |
4. |
Cut a 2” square from the same color of cardstock,
a second 2” square and a 1” square from a different
color. |
| |
5. |
Place the 3 in 1 Corner punch upside down on the
mat then punch the same design from each corner of the 2”
square. Fold the square in half making sure the corners are aligned,
then punch again on the folded corners. Unfold the square, then
re-fold in the opposite direction. Punch the two folded corners.
Repeat with the second square using the same, or a different design. |
| |
6. |
Carefully punch a corner design at each of the corners
on the 1” square. Use the hand punch to punch a hole at the
center of this square only. |
| |
7. |
Adhere the two, 2” squares together as shown
then adhere to the front of the card. |
| |
8. |
Place a brad through the center of the 1” square
then adhere to the center on top of the 2” squares. Optional:
Decorate the center with a button, gemstone or any other type of
decorative embellishment. |
| |
|
|
| Sponsor:
Fiskars |
|