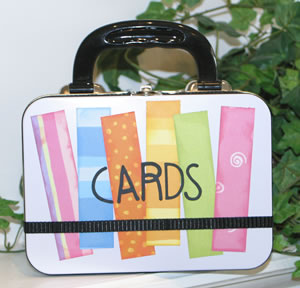
Card Lunch Box Gift Set
By Heather Lancaster |
| Materials
Needed |
 |
 |
20-7013 Lunch box tin |
 |
42-9869 Michael’s Paper Slab V |
 |
43-8033 Teeny Tiny Stickeez |
 |
Art Accentz Microfine Sparklerz Glitter
24-3026 Sapphire, 24-3016 Purple, 24-3020 Burnt Orange, 24-3002
Yellow Gold, 24-3013 Baby Pink, 24-3029 Ocean, 24-3023 Chartreuse,
24-3012 Rose Pink |
 |
38-0982 Sizzix Doodle Block Uppercase
Alphabet Set |
 |
38-1067 Sizzix Frames Square combo Die |
 |
38-0811 Sizxix Rectangle #2 Die |
 |
Sizzix Machine |
 |
¼” Terifically Tacky Tape |
 |
Assorted Color Box ‘Chalk’
Inks |
 |
Foam squares |
 |
White & Black Cardstock |
 |
Adhesive |
 |
Black ribbon |
 |
Xyron |
 |
34-0403 Zision 12” Trimmer |
 |
19-1004 Tool Bone Folder |
 |
Beed Sweeper |
| |
| Instructions |
| Cards: |
|
| 1. |
Cut 6 sheets of white cardstock in half to make
12 card liners. Using the bone folder, score each card
|
| 2. |
Choose 6 pieces of paper from any Paper Slab and
trim to 81/2 x 11” size. Save the leftover scraps for embellishing
your cards! Use the bone folder to score each card. |
| 3. |
Cut the long skinny leftover strips in half and set
aside. We will use these to decorate the lunch box. |
| 4. |
Using the Sizzix machine, cut two sets of rectangles
out of the wider leftover strips. These will sit on the front of
your card. |
| 5. |
Save the negative frames that our leftover from your
rectangles to be used on your envelopes. |
| 6. |
Cut one additional strip of paper from each color.
Make the strip the same size as the skinny leftover, and wide enough
to fit on the side of your lunch box. |
| 7. |
Using the Sizzix machine, cut 12 med sized squares
out of white cardstock.
|
| 8. |
Spread out all of the cards and match each one with
a contrasting colored rectangle and a white square. |
| 9. |
Use ink to edge all pieces, including the strips
for the lunch box. Try using contrasting colors of ink or matching
colors! |
| 10. |
Cut Stickeez designs into individual pieces and adhere
one to each white square. |
| 11. |
Embellish Stickeez designs with Art Accentz Microfine
Sparklerz glitter. |
| 12. |
Attach foam squares underneath each white square
and assemble cards. |
| |
|
| Envelopes: |
|
| 1. |
Use the negative images of the rectangles that you
saved above to decorate the fronts of each envelope. |
| 2. |
Use the tiny white frame from the squares you cut
above to decorate the envelope as well. Simply chalk the white frame,
then place the recipients monogram in the box. |
| |
|
| Lunch Box: |
|
| 1. |
Run inked strips of paper through a Xyron machine
and adhere to the front, sides and back of the lunch box. |
| 2. |
Cut a title for your gift box using the Sizzix Doodle
Block Uppercase Alphabet. Use a Xyron and adhere to the front of
the box. |
| 3. |
Tape the edge of the box front with Terifically Tacky
Tape then stick black ribbon in place. |
| 4. |
Adhere a line of black ribbon across the front of
the box with Terifically Tacky Tape. |
| 5. |
Give this great gift box of cards to a friend and
then make a second set to keep for yourself! |
| Sponsor:
Provo Craft |