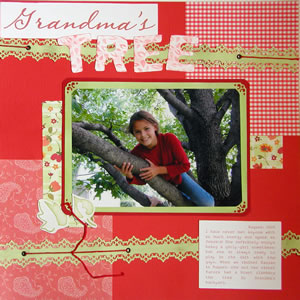
Grandma’s Tree
By Jennifer Davis for Fiskars
|
| Materials
Needed |
 |
 |
Fiskars Products:
Lace Border Punch
Lace Corner Punch
Corner Edger Scissors
Eyelet Setter
Scrapboss
Scrapboss Sampler Stencil
Leaf Texture Plate
Texture Tool
Shape Cutter
Shape Cutter Letters #1 Template |
|
Other Products:
Eyelets – Making Memories
Red Paisley & Gingham Patterned Papers: Unknown
Floral Patterned Papers: MMI
Computer Font: PegsannaHMK, My Type of Font
Red Cardstock: Bazzill
Green Patterned Paper |
|
Products Not Included in Kit
Chalk Ink – Versamagic (Magic Red, Green Leaf)
Brown Chalk – EK Success |
| |
|
| Instructions |
| 1. |
Cut lace strips with Fiskars Lace Border Punch.
|
| 2. |
Cut corners of green photo mat with Fiskars Lace
Corner Punch. |
| 3. |
Chalk lace pieces and green photo mat with brown
chalk to “dirty” it. |
| 4. |
Cut corners of photo and red photo mat with Fiskars
Corner Edger Scissors |
| 5. |
Place red gingham paper in the corner of background
cardstock. Place paisley paper in opposite corner. Place green floral
paper as shown. |
| 6. |
Adhere lace strips with adhesive, attach eyelets
with Fiskars Eyelet Setter (medium size). |
| 7. |
Emboss leaf embellishments with Fiskars Scrapboss
and Scrapboss Sampler Stencil. |
| 8. |
Ink leaves with green chalk ink such as Colorbox
or Versamagic chalk ink. |
| 9. |
Texturize white cardstock with Fiskars Leaf Texture
Plate & Texture Tool |
| 10. |
Cut letters for “TREE” out of texturized
white cardstock with Fiskars Shape Cutter and Letters #1 Template. |
| 11. |
Ink the letters with Red Chalk ink (such as Colorbox
or Versamagic chalk ink). |
| 12. |
Ink edges of title and journaling blocks. Adhere
as shown. |
| 13. |
Attach photo mats, photo, and leaf embellishments. |
| 14. |
Tie red embroidery thread through eyelets. Tape on
back where necessary. |
| Sponsor:
Fiskars |
|