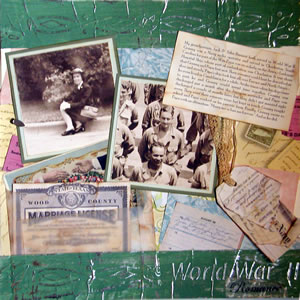
World War II Romance
by Jennifer Davis |
| Materials
Needed |
|
 |
Fiskars Products Used:
Eyelet Setter
Scrapboss
Scrapboss Vines Stencil Set
Mini Shapeboss Stencil Set Italic Alphabet
Shape Cutter
Shape Cutter Envelope 2 Template |
|
Other Products Used:
Eyelets – Making Memories
Photo Turns – Making Memories
Brads – Unknown
Vintage Patterned Paper: K&Company
Floral Patterned Papers: Provo Craft, Anna Griffin
Pink Patterned Paper: Unknown
Stickers: Karen Foster
Computer Font: Poor Richard, Edwardian Script
Aluminum Duct Tape: Unknown
Ephemera: diary entries, wedding certificate, Army & Navy Documents,
Postcard – scanned and copied from designer’s original
documents
White vellum: paperandmore.com
Tag Die Cut: Spellbinders
Lace, Embroidery floss: Unknown |
|
Products Not Included in Kit:
Sage Green Acrylic Paint: Plaid/Apple Barrel
Sponge Brush
Brown Walnut Ink Pad - Unknown
Sanding block |
| |
|
| |
| Instructions |
| 1. |
Place patterned paper and pink stickers on background
cardstock to start
“collage” look (as shown in photo). |
| 2. |
Emboss top and bottom borders into aluminum duct
tape with Fiskars
Scrapboss and Scrapboss Vines & Mini-Shapeboss Italic Alphabet
Stencils. |
| 3. |
Paint with green acrylic paint. Set aside to dry.
(2 coats recommended for
better look). |
| 4. |
Cut vellum envelope with Fiskars Shape Cutter and
Envelope #2 Shape
Cutting Template. Glue edges of envelope and ink lightly with walnut
ink. |
| 5. |
Distress tags, marriage certificate, and journaling
by crinkling and inking
lightly with brown ink or a walnut ink pad. |
| 6. |
Set eyelet into the 3 tags with medium Fiskars Eyelet
Setter. Thread lace
and embroidery floss through eyelet. Tear first two tags as shown. |
| 7. |
Adhere envelope, photos, and diary entry page, placed
as shown. Place postcard and marriage certificate into envelope. |
| 8. |
Attach photo turns to page by punching holes for
brads with small Fiskars Eyelet Setter. |
| 9. |
Place painted aluminum pieces across the top and
bottom of page. Gently sand with sanding block to expose embossed
portions. |
| 10. |
Tear and ink “Romance” portion of title. |
| 11. |
Adhere title and tags to page. |
| Sponsor:
Fiskars |
|