Express Shape Accents
By Julie McGuffee |
| Materials
Needed |
 |
 |
Fiskars® Circle Templates |
|
Fiskars® Largte Frame Templates |
|
Fiskars® Shape Express |
|
Fiskars® Self Healing Mat |
|
Fiskars® Personal Paper Trimmer
– 12” |
|
Fiskars® 1/8th Hole punch |
|
Brads |
|
Assorted Cardstock |
|
Adhesive |
| |
|
| |
| Instructions |
| 1. |
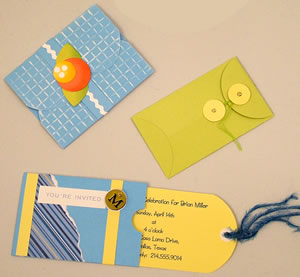
Refer to photos for ideas. |
| 2. |
To create the tag envelope, cut a rectangle 8”
x 6 ½”. Score fold lines 1 ½” from left
side and 1 ¾” from opposite side. Fold toward the
center. Cut a half circle from upper edge at the center of the
3” wide section. |
| 3. |
Score a fold line about 2” from the bottom
edge. From outside edges cut along fold up to the point where
the fold lines intersect. Cut a partial circle from the top of
the center piece to curve. Fold sides inward then glue together
where they overlap. Fold the bottom piece up then glue in place.
|
| 4. |
Cut a rectangle a little less than 3” wide
and about 3” longer than the tag envelope. Curve the top
of the rectangle with the circle template to create the tag. |
| 5. |
Punch a hole in the top of the tag at the center.
Reinforce if desired then thread fibers through the hole. |
| |
Heart templates were used to curve the edges for the
blue card and the string fasteners were created using the smallest
circle shape. Glue two circles together then either punch a hole
at the center and insert a brad or an eyelet. |
| Sponsor:
Fiskars |
|