|
Monogram Card
By Julie McGuffee |
| Materials
Needed |
 |
 |
Fiskars® Alphabet and Envelope
#2Templates |
|
Fiskars® Shape Express |
|
Fiskars® Self Healing Mat |
|
Fiskars® Personal Paper Trimmer
– 12” |
|
Fiskars® Sunburst Border Punch |
|
Fiskars® 1/16th Hole punch |
|
Fiskars® Cardboss and Stencil |
|
Craf-T Glimmer Chalks |
|
8 Brads |
|
8 ½” x 11” Pink Pearlized
Paper (2 sheets) and white |
|
Adhesive |
|
Wax Paper |
| |
| Instructions |
| 1. |
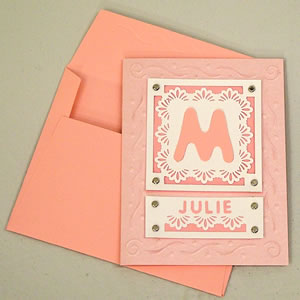
Cut the paper in half to make two, quarter cards. Score along
the center of one piece and fold in half. |
| 2. |
With the front of the paper facing down, place the stencil on the cardboss
base between the two stencils then emboss the border and corner
designs. |
| 3. |
Cut a 3” square from the white paper. Use the border punch to punch
the design at center of each side of the square. |
| 4. |
Cut a letter from the alphabet templates then adhere to the center of this
square. |
| 5. |
Cut a 3” x 1” rectangle from white paper then punch the same border
design at the center of one side. |
| 6. |
Punch a hole at each corner of the square and the rectangle. Place a brad
in each hole. |
| 7. |
Referring to photo center then adhere the square and rectangle on the front
of the card. |
| 8. |
Create an envelope for each card. |
| OPTIONAL:
Use punch letters or rub-ons to write a name on the rectangle. |
| Sponsor:
Fiskars |
|