Lettering: New Techniques Unique Styles
– Address
Books
Materials
Needed
42-9847 Christina Cole 8x8 Paper
Slab
19-1040 Punch n bind
19-1062 Black Combs
42-9862 6x6 Crafters Cardstock Block
Sizzix Machine
38-1094 eon-Toed Uppercase Alphabars
38-1062 Small Rectangle/Triangle Tab
set
42-1200 Large Vowel Halfabitty Stickers
17-1111 Retro Bradletz
43-5515 Christina Cole Floral Stamp
Stickers
4404098 Coluzzle Large Circle Template
Coluzzle Cutting Mat & Knife
Shrink Plastic
Ultra Thick Embossing Powder -Embossing
Gun -Clear Embossing Stamp Pad
Permanent Markers
Black Thread & Needle
Adhesive
Instructions
Basic Book
1.
Choose 15 sheets of cardstock from
the 6x6 crafters block. Colors can be in sets of 3 or random.
2.
Choose one sheet of designer paper from
the Christina Cole 8x8 slab – trim to 6”x 6”.
3.
Punch all sheets using the Punch n Bind
– trim any ½ holes if desired. Choose one sheet of
punched cardstock that contrasts well with your chosen patterned
paper. Use the Coluzzle Large Circle template to cut a curved edge
on the right side.
4.
Ink the edges of the designer paper
and the curved top cover.
5.
Set all pages aside while you design
the cover of the book.
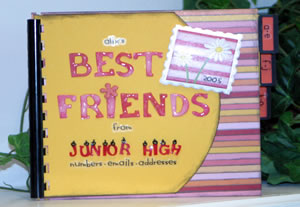
Best Friends Epoxy-Look
Title
6.
6. Cut ‘Best Friends’ out
of Sizzix Pigeon Toed Uppercase letters. Trim the top loop off of
each letter.
7.
Rub the top of each letter on the clear
embossing ink stamp pad, then dip immediately into the Ultra Thick
Embossing Enamel.
8.
Heat each letter with an embossing gun.
Be careful not to over heat the letters as they will burn.
9.
Adhere letters on the cover, leaving
room to write above and below the title as shown in the demo project.
10.
Dot the ‘I’ in your title
using a flower Bradletz.
Shrink Plastic Title
11.
Using the Sizzix Pigeon Toed Alphabet,
cut ‘Junior High’ out of pre-sanded shrink plastic.
Cut with the sanded side faced down.
12.
Use permanent markers to color each
shrink plastic letter.
13.
Carefully , and slowly, heat each letter
with the embossing gun. Heat one letter at a time, holding the letter
down with a pair of tweezers or scissors so that it doesn’t
blow away.
14.
Place finished shrink plastic title
in place on the cover of the book and mark the holes on each letter
using a needle. Sew each letter in place, following these pre-punched
placement holes.
Assembly
15.
Adhere the curved front cover to the
designer paper.
16.
Bind all pages together following the
directions that come with your Punch ‘n Bind machine.
17.
Cut 5 tabs with the Sizzix Machine and
the rectangular tab from the Tab die.
18.
Adhere tabs to every 3rd page within
the book.
19.
Add sub-titles and alphabet sections
to the tabs using the Halfabitty alphabet stickers.