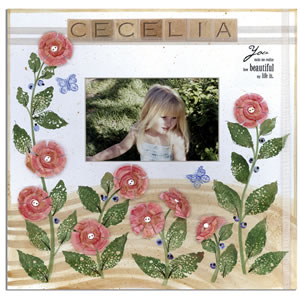
Cecilia
By Jane Guthrie for All
American Crafts |
| Materials
Needed |
 |
 |
Prime Arts Limited 12" x 12"
Craft Mat in White
|
|
Cardstock in white |
|
12" x 12" scrapbook paper
of choice |
|
4" x 6" photo of choice |
|
Delta Technical Coatings
Paint for Paper in Baby Blue, Chocolate Kiss, Dynamo Blue, Garden
Green, Jazzy Purple, Just Black, Petal Pink, Red Blaze, and Sunburst
Yellow
Tea Dye Varnish |
|
Cloud 9 Design The Woodstone Collection
Alpha Stickers, Naples
Simple Thoughts, Love Stickers |
|
Loew-Cornell
Double-Time Brushes Plaid Striper, Size 8/4
Berry Maker, Small and Medium
Series 7300 Shader, No. 10
Series 7350 Liner, No. 4
Series 4550 Wash, 1"
Pure Bristle, No. 4
Compressed Sponge
Chaco Paper |
|
Rubber Stampede Stamps, Butterfly and
Swirl |
|
Three 14" lengths of ¼"-wide
sheer ribbon in ivory |
|
Wimpole Street Creations Basics Itty
Bitty Buttons in white |
|
Glue stick |
|
Glue Dots International glue dots |
|
Double-sided adhesive tape |
|
Cellophane tape |
|
Tracing paper, transfer paper, stylus,
palette, pencil, scissors, container of water, paper towels |
| |
| Instructions |
| 1. |
Lay the mat board onto a flat surface. Trace
the pattern onto tracing paper. Use the stylus and light pressure
to transfer the pattern onto the mat board. |
| 2. |
Pour a small puddle of Chocolate Kiss onto the
palette and dilute with water to the consistency of light cream.
Load the plaid striper with the mixture. Follow the pattern lines
to lay in the wavy strokes (Fig. 1). Allow to dry.
 Fig.
1 Fig.
1
|
| 3. |
Dip the wash brush into the tea dye varnish and
apply one coat to cover all of the strokework (Fig. 2).
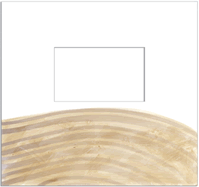 Fig.
2 Fig.
2 |
| 4. |
Load the pure bristle brush with tea dye varnish
and spatter the entire surface of the mat board. Allow to dry.
|
| 5. |
Create a 1/8"-wide border around the plain
edges of the mat board using the small head of the plaid striper
and tea dye varnish. Set aside to dry. Clean and rinse all brushes.
|
| 6. |
Pour a small puddle each of Garden Green and Sunburst
Yellow onto the palette. Mix equal parts of each and, using the
liner brush, lay in the stems.
|
| 7. |
Trace the leaf patterns onto tracing paper. Use
the Chaco paper to transfer the patterns onto the compressed sponge.
Cut out each shape and place into water to expand.
|
| 8. |
Using one shape at a time, pat into the same yellow/green
mixture as for the stems and press along the stems (Fig. 3), referring
to pattern for placement.
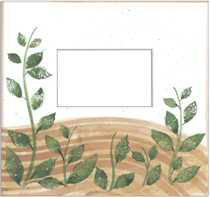 Fig.
3 Fig.
3 |
| 9. |
Use the liner brush and Just Black to connect
the leaves to the stems.
|
| 10. |
To make the berries, pour a small puddle each
of Baby Blue and Jazzy Purple onto the palette. Pat the medium
Berry Maker into Baby Blue and, referring to pattern for placement,
gently press the tip along the stems. Pat the small Berry Maker
into Jazzy Purple and press at random onto the berries to form
the centers.
|
| 11. |
Pour a small puddle each of Red Blaze and Petal
Pink onto the palette. Add water to dilute each to the consistency
of light cream. Using the wash brush, apply one coat of Petal
Pink to both sides of the cardstock (Fig. 4).
 Fig.
4 Fig.
4
While still wet, crumple the cardstock, then unfold and lay flat
to dry. When dry, load the wash brush with a small amount of Red
Blaze and use a slip-slap motion to apply to both sides of the
cardstock (Fig. 5). Allow to dry. Clean the wash brush.
 Fig.
5 Fig.
5
|
| 12. |
Using the shader brush, apply straight Red Blaze
to the swirl stamp. Press the stamp repeatedly onto the cardstock
with the images spaced about 1" apart (Fig. 6), recoating
the stamp with paint after each application. Allow to dry.
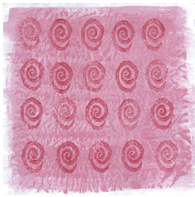 Fig.
6 Fig.
6
|
| 13. |
Use the wash brush to apply one coat of tea dye
varnish to one side of the cardstock (Fig. 7). Allow to dry.
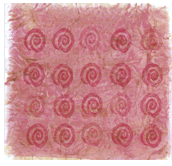 Fig.
7 Fig.
7 |
| 14. |
Cut a circle approximately 1/8" outside the
edge of each swirl image. Using just the tip of the scissors,
cut small notches around each circle to create a petal effect
(Fig. 8).
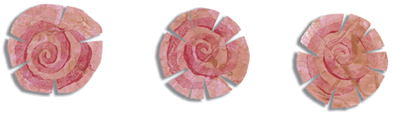 Fig.
8 Fig.
8
|
| 15. |
Use a glue dot to adhere a button in the center
of each circle to complete the flower (Fig. 9).
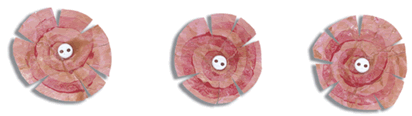 Fig.
9 Fig.
9 |
| 16. |
Use a glue dot to adhere the flowers onto the
stems, referring to pattern for placement.
|
| 17. |
Measure ¾" down from the top edge
of the mat board and adhere one length of ribbon horizontally.
Use a small strip of cellophane tape to secure the ends onto the
back of the board. Measure ¼" down from the first
ribbon strip and adhere another length of ribbon, securing in
the same manner. Measure ¼" in from the right side
of the mat board and adhere the remaining length of ribbon vertically,
weaving the top end over and then under the two horizontal ribbon
lengths, referring to project photo for guidance. Use a small
strip of cellophane tape to secure the ends to the back of the
board.
|
| 18. |
Select the appropriate letter stickers to spell
out the name desired. Remove the backing from each letter and
press into place centered horizontally across the page and vertically
along the first ribbon strip so that the bottom edges of the stickers
touch under the second ribbon strip.
|
| 19. |
Select saying sticker desired and adhere near
the top right corner of the mat board as shown in the project
photo.
|
| 20. |
Use the shader brush to apply Baby Blue to the
butterfly stamp and press onto the mat board, referring to pattern
for placement. Without cleaning the stamp, apply Dynamo Blue onto
the butterfly stamp, align the stamp slightly off to one side,
and press each of the previously stamped image to create a “flutter”
effect.
|
| 21. |
Position photo of choice within the mat board
opening. Once satisfied with the placement, secure photo in place
with double-sided tape. To finish the page, select a sheet of
scrapbook paper and adhere with double-sided tape to the back
of the board. |
| Sponsor:
All American
Crafts |