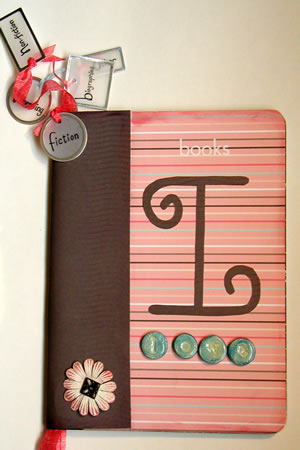
BOOKS I LOVE journal
By Beth Madland |
| Materials
Needed |
 |
 |
Composition book (found in the school
supply section of a drug store) |
|
Fiskars Tools: Wave Crimper, micro tip
scissors |
|
Vellum Tags: Making Memories |
|
Flowers: Making Memories |
|
Ribbon: SEI |
|
Rub-on Creams: Craft-T Productions |
|
Polymer Clay: white Sculpey |
|
Rub-on alphabet white: Making Memories |
|
Letter Stamps: source unknown |
|
Adhesive: Xyron, glue stick, glue dots,
herma fix |
|
Dimensional glaze: Plaid |
| |
|
| |
|
| |
| Instructions |
| 1. |
Open the composition book and trace around the
front cover onto the back of a decorative sheet of paper. Repeat
this step with the back cover. Cut out the covers. Note: The cut-out
covers do not have to cover the binding of this book. |
| 2. |
Apply a liberal amount of adhesive (using squares,a
xyron machine or gluestick) to the back of the cut-out paper and
adhere them to the front and back of the composition book. |
| 3. |
Cut a contrasting sheet of 12x12 decorative paper
in half. Run both of these sheets through the Fiskars wave crimper.
Remember, when using the crimper your paper length will shrink a
little bit. One of these 6x12 papers will be the binding; the other
one will be used for the letter “I” in the title “Books
I Love.” |
| 4. |
Trim the crimped sheet of paper to the length of
the binding of the book and adhere it to the book overlapping the
front and back covers. |
| 5. |
Print out an enlarged letter “I” on your
computer. Staple that to the front of the second crimped 6x12 paper
so that the paper stays in place. Trim out the letter “I”
using Fiskars micro tip scissors. |
| 6. |
Now for the polymer clay letters. Take some clay,
massage it with your fingers and form it into a small ball larger
than the size of a pea. Flatten that ball with your thumb on a piece
of parchment paper. Next, take a letter stamp and imprint the letter
“L” onto the flattened clay. Repeat this for each letter
of the word LOVE. Bake the pieces following the instructions on
your package. |
| 7. |
Once the clay pieces have cooled you can add color
to the baked clay using Craft-T rub-on creams. I used my finger
when applying these creams but you can also use a make-up sponge.
I sealed my clay letter tiles with dimensional glaze. |
| 8. |
Adhere the cut-out/crimped letter “I”
to the middle of the page. I added the word “Book” to
the top of the cover using white rub-on letters. You can use glue
dots to attach the clay letter tiles to the bottom. |
| 9. |
Use a dark Craft-T rub-on cream around the edges
of the book for an altered look. |
| 10. |
The ribbon tags are used as dividers for this book.
Since my journal happens to be about “Books I Love”
I put different book styles on my tags. For example, fiction, non-fiction,
parenting and biographies. Cut 12-15 inch strips of ribbon and tie
a knot at the top. Pull the other end of the ribbon through the
hole in the tag until the knot. You could also knot the bottom of
the ribbons after adding beads or charms to the ribbon. |
| 11. |
Add embellishments to front cover of the journal.
I added flower petals to my album cover that I altered using Craft-T
rub-on creams. |
| Sponsor:
Fiskars |