| One big advantage of digital
scrapbooking is that you can save a file of each page in your computer.
You can turn your pages into electronic files: by scanning or, basically,
taking a photo of it. . . . or, you can design pages using a software
program like PhotoShop or Word. Either way, you end up with a file
that you can reproduce as often as you like. Once you have a
file, what’s easier than simply printing more copies of
it? Make your original in 12x12, scan it or save it as a file
in your computer, and you’ll have many options for reprinting
in smaller sizes.
Think about the gifts you can make! It’s not complicated,
and people just love these.
Once you’ve created a page, save it in your computer as
a jpeg or a tif file. If your page started as a 12x12” original,
just remember that the aspect ratio has to stay the same. You
can reprint that file as an 8x8” or a 6x6” image because
both of those are also square and will reproduce without cutting
off any of the original dimensions you see in the original. The
program will figure this out for you.
When you print your page, you need to give the printer some information.
Every program has its own way of asking you, but it all boils
down to you telling the printer 3 things: what size image and
on what size and type of paper you want to print.
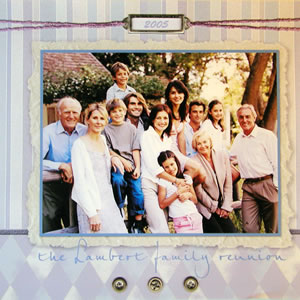
This page was saved as a tif file. To print it in PhotoShop Elements,
click on File/Print and then type in the measurement that you
would like as your final image size. It automatically changes
the second number. With a letter size printer and if you want
to use letter size paper that’s 8.5 x 11”, you can
fit either an 8x8, a 6x6 or even a 4x4 version of the original
by typing in these numbers.
If you wanted to make an exact replica in 12x12, you could do
that too but you would need to use a wide format printer like
the Epson 1800.
Equipment/materials used:
R300
R1800 printer
|