Fiskars® Pop-up Punches – Foot, Hand, Heart, Flower, Moon and Star
Fiskars® Mini Alphabet Punches (Card only)
Fiskars® Frame Templates – Circles
Fiskars® Ultimate ShapeXpress
Fiskars® Self Healing Cutting Mat
Fiskars® Euro Trimmer
Fiskars® 1/16th Hole Hand Punch
Fiskars® Paper Edgers - Scallop
Fiskars® Mini Shape Boss Baby Theme Stencil
8” x 8” Dk Pink Cardstock - DCWV
8” x 5” Med. Pink Cardstock – DCWV
8” x 8” Lt. Pink Cardstock - DCWV
8” x 8” Patterned Paper (Coordinating pink and green)
White cardstock
4 Silver Mini Brads
Adhesive
Mini Foam dots
Sanding sponge
Green ribbon
Green embroidery floss
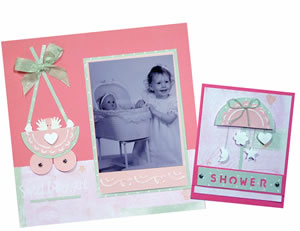
Note: When choosing papers for your layout, look for colors and styles that complement the photograph and theme and for solid colors to coordinate with the background paper.
Instructions
1.
Cut the photo mat from light pink paper ¼” wider than the photograph and about ¾” longer. Emboss the design across the bottom of the mat.
2.
Emboss the circle design onto light pink paper. Cut around the design with scalloped scissors. Rub the sanding sponge lightly over the embossed designs.
3.
Cut a green circle a little larger than the light pink circle. Center then adhere the pink circle on top of the green circle. Cut the circle in half. One will be used for the “baby crib” embellishment on the page and the second for the umbrella on the card.
4.
Cut three, 1” circles. Punch a hole in the center of each of two of the circles and insert a brad.
5.
Cut two thin strips of green paper about ¼” wide and 4” long.
Referring to the photograph, assemble the layout as follows:
1.
Adhere a 2 ½” wide strip of printed paper across the bottom of the medium pink cardstock.
2.
Adhere the photo to the light pink mat above the border at the bottom. Adhere to a piece of green paper cut ¼” wider and longer than the pink mat. Adhere to the page as shown.
3.
Adhere the two “wheels” and one of the half circles at the left side of the page as shown.
4.
Punch two hands, two feet and one heart from white cardstock. Adhere the two hands at either side of the remaining circle then adhere to the page as shown. Adhere the two feet in place and the narrow green strips, overlapping at the top.
5.
Tie a green bow then adhere to the point where the strips cross.
5.
Adhere a white heart to the center of the heart circle with a foam do.
Referring to the photograph assemble the card as follows:
1.
Score then fold an 8” x 5” piece of dark pink cardstock in half to create a 4” x 5” card. Adhere a 3 ¾” x 4 ¾” piece of patterned paper to the center front of the card.
2.
Punch the word “shower” from a 4”x 1” strip of dark pink cardstock. Trim if necessary so the word is centered. Adhere to the card about ¾” from the bottom edge.
3.
Adhere a narrow strip of green paper down the center front of the card for the umbrella handle. Punch the small shapes from white cardstock then adhere with foam dots. Sandwich one end of a short length of embroidery floss between the shape and the dot and the opposite end behind the half circle (umbrella). Adhere the “umbrella” to the card.
4.
Tie a small bow with embroidery floss then adhere to the umbrella