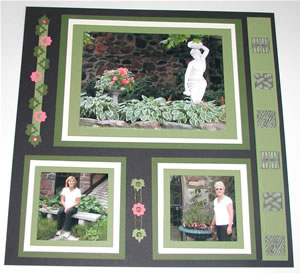
Spa Day Scrapbook Page
By Marilynn Oskamp
|
| Materials
Needed |

 |
 |
Switch embossing Stencils: rectangle/star (4.050.072), borders (4.050.080)—Ecstasy Crafts Inc.
|
|
Clippnches –leaf (CP 004), flower (CP003), weaving punches (CP007)—Ecstasy Crafts Inc. |
|
Moss Green 12 X 12 pages X2 |
|
Ivy Green 12 x 12 pages x2 |
|
Black 12 x 12 pages x2 |
|
Black card stock |
|
Coral card stock |
|
Ivory card stock |
|
Light green vellum |
|
Embossing stylus |
|
Hobby knife |
|
Scissors |
|
Double-sided tape |
|
Eyelets (green and deep pink muted shades) |
|
Ribbon: moss green |
|
Glue |
| |
All of the pictures on these scrapbook pages are matted first on the moss green card stock, then ivory card stock, and finally on ivy green card stock. |
| Instructions |
| 1. Photo Picture Puzzle |
| |
a. Place the rectangle/star switch embossing stencil on top of your photograph (4”x6”) and tape in place. Cut out all of the window shapes using a hobby knife. Place the pieces on another piece of card stock in the correct order for the puzzle. Hint: Try cutting on glass…it makes for a smoother cut and creates less drag.
b. Now gently remove the stencil, turn it over and replace so that the remaining pieces of the picture show through the windows. Cut the remaining pieces of the picture out of the photo and place in the correct order with the others.
c. Now place your stencil (or left over cut out photo) on top of a black piece of card stock. One by one place the picture pieces into the stencil or the frame in their proper places. You may use double sided tape or appropriate glue.
d. Once you have filled the windows on the stencil turn it over again so that the openings are not over photo pieces.
e. Attach the remaining photo pieces into their correct positions.
f. Remove the stencil (frame) and admire your picture puzzle. |
| 2. Side Borders |
| |
a. Cut a 1 1/4” strip of moss green card stock.
b. Attach the border switch embossing stencil (4.050.080) to the top of the card stock and cut out 6 evenly spaced squares using a hobby knife and the windows on the stencil. You will need to move the stencil one time.
c. Now place the moss green strip front side down on top of the stencil. Align the stencil so that the cut out openings are over the patterned areas of the stencil.
d. Using an embossing stylus gently emboss the opening into the card stock so that on the front you have an embossed box. Repeat for all of the spaces between the windows.
e. Cut a 1 1/4” strip of light green vellum.
f. Place the vellum on top of the border switch embossing stencil. Emboss the 3 patterns into the vellum with the embossing stylus.
g. Move the stencil and repeat step 6 so that along the strip you have 6 patterns to fit in the six openings of the moss green strip of card stock.
h. Attach the vellum strip to the card stock using double sided tape or glue ensuring that the vellum embossed patterns show through the windows.
i. Attach to the scrapbook pages on the left and far right sides using double-sided tape. |
| 3. Clippunch layered frame: |
| |
a. Punch out 14 ivy green leaves and 18 moss green leaves using the leaf Clippunches (CP004). First punch the inner design and then realign using the outer punch (full leaf design). Turn the punch over so that you can see the inner design before punching the outer design.
b. Mount the photo onto moss green card stock (approximately 3 1/2 x 4 1/4”). Clip the punched designs around the photo to form a frame.
c. Attach the moss green picture and frame to a matte of ivory using double-sided tape. Ensure that the small part of the Clippunch design on the back is covered with the tape.
d. Evenly space the moss green leaves around the ivory frame (offset with the ivy green leaves).
e. Attach the ivory matte to a piece of ivy green card stock and admire the Clippunch frame. |
| 4. Clippunch strip design: |
| |
a. Cut a piece of moss green card stock approximately 1/2” x 6”. Punch out 6 ivy green leaves and 3 flowers using the leaf and flower Clippunches (CP004 and CP003). See step #1 above.
b. Punch out two leaves (full designs) using the leaf punch.
c. Clip the punched designs to the strip of moss green card stock creating a pattern as shown by alternating the shapes on each side of the strip. Tape the designs to the back of the strip and attach to the scrapbook page in the desired position using eyelets through ivy green leaves. |
| 5. Clippunch Weaving designs: |
| |
a. Cut several small pieces approximately 8” of 1/4” moss green ribbon.
b. Punch out 9 moss green leaves, 2 coral flowers and 6 ivy green leaves using the rounded weaving punch as the inner punch. See Step #1 under Clippunch layered frame.
c. Cut an angle at each end of the ribbon and cover with a piece of cello tape cutting to the angle (this will stiffen the ribbon and make the weaving easy).
d. Decide on the color scheme you wish to use and weave the leaves and flowers onto the ribbon starting with the top colored design.
e. Punch or cut slits into the scrapbook page and weave the designs to the page taping the ends to the back of the page. For designs close to the edge of the page you may use the weaving punch to create the weaving slit in the page. |
| 6. Journaling: |
| |
a. Print your journaling onto the light green vellum using an ink jet printer or photo printer. Set the printer to print on photo paper when printing on vellum and it will avoid smearing when dried. Be very careful as it takes at least one hour to dry! The font used in this example was Edwardian Script ITC by Microsoft.
b. After the ink has dried, dry emboss a design from the switch embossing stencil under the title.
c. Punch out 4 moss green leaves and 2 ivy green leaves using the leaf punch alone.
d. Attach the vellum to a piece of moss green card stock and ivy green card stock using 4 eyelets through the center of the punched leaves in each corner.
e. Attach two ivy green leaves to all layers using the muted pink eyelets as an accent. |
| Sponsor:
Ecstasy Crafts Inc. |