Knead clay until smooth and workable. Roll out a very thin sheet of clay using a pasta machine or the acrylic roller.
2.
Carefully place the sheet of clay on an index card and bake according to manufacturer’s instructions. Use an oven thermometer to insure that the clay is not overbaked. Sculpey UltraLight clay is very flexible and lightweight after baking- these qualities make it very suitable for scrapbook pages.
3.
Color the baked sheet of clay with the glimmer chalks, blending colors as desired.
4.
Punch the buttons as follows: Use the button punch on the sheet of clay to create the button detail. Finish the button by punching out the button details with the circle punch. It’s easiest to work with the circle punch turned upside-down, so that you can easily center the smaller punched details.
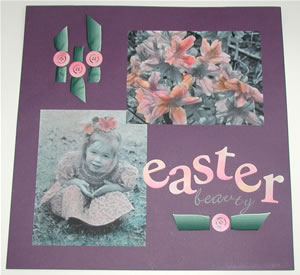
Putting the page together:
1.
Use a copier or printer to make black and white copies of the selected photographs on the printable sticker paper. Trim the copies to desired size.
2.
Use sponge-tip applicators or your fingertips to add glimmer chalk to the photocopies. For best results, apply color sparingly, blending colors as you work, and leave some areas uncolored. The contrast of chalked areas with black and white adds interest to the photos.
3.
Chalk the cardstock letter stickers for the title.
4.
Mark a small piece of graph paper with a cutting guide for the ribbon weaving.
5.
Adhere the chalked photos to the 12 x 12 page, overlapping them slightly.
6.
Position the graph paper template on the page and use the craft knife to make the marked cuts.
7.
Weave pieces of ribbon through the slits on the page and then trim the ribbon ends.
8.
Adhere the button embellishments using adhesive dots.
9.
Attach the chalked monogram stickers as desired, then add rub-on letters to complete title.