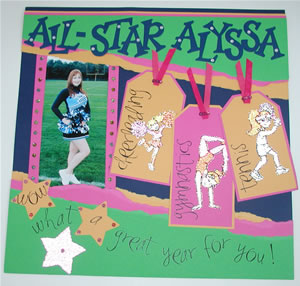
All-star Alyssa Scrapbook Page
By Connie Glennon-Hall |
| Materials
Needed |
 |
 |
Swarovski® Crystals, 4mm , mixed colors
|
|
Crystalette Press-on Embellishments – cheerleader, gymnast, tennis |
|
Crystalette Crystal Shimmer Designer Sheet – bubble gum pink |
|
Zwade |
|
Papers – 12” x 12” cardstock: navy (2), green (1), pink (2), yellow (2) |
|
Rub-on alphabet |
|
Kandi Kane Applicator Wand |
|
Adhesive dots dispenser |
|
Sizzix® Sheriff letter punch system |
|
Star punch |
|
Mini stapler |
|
Paper trimmer |
|
Scissors |
|
Scoring tool ( stylus, bone folder, dull pencil or scissors point) |
| |
| Instructions |
| 1. |
Page background: Cut a strip of green paper 4 ¾” x 12”. Cut a strip of pink paper 5 ½” x 12”. Cut a strip of yellow paper 6 ¼” x 12” Referring to photo, (and using a ruler as a loose guide) tear the green paper on a slight diagonal, so that both narrow ends (after the tear) are approximately 1 ¼” wide. The torn green paper becomes your guide for tearing the pink and yellow paper. Lay the straight edge of the green paper over the straight edge of the pink paper; drop it down a bit, showing a pink border. Position the ruler diagonally across the pink paper and tear, slightly lower than the torn green edge. Repeat for the yellow paper. Adhere the layers to the top of the page, allowing small borders of navy, yellow, and pink to show. Adhere the remaining layers flush to the bottom of the page. Note: Adhere only the straight edges, not the torn edges, to create “pockets” on the page. |
| 2. |
Photo: cut two 2” strips of pink paper, the height of your photo. Score lengthwise ½” from one edge of each, on the inside. Fold, crease sharply, and wrap around left and right edges of photo. Apply adhesive to inside of ½” areas and adhere to front of photo. Secure the wider part of strips to back of photo. Following manufacturer’s instructions use Applicator Wand to apply crystals to pink edges, placing one every ½”. Set photo aside. |
| 3. |
Tags: Cut three 1 ½” wide strips (1 pink, 2 yellow). Make them long enough to accommodate the rub-on word and the sports Crystalette. Cut corners at one end to create a tag shape. Double mount on coordinating paper; trim to tag shape. Add rub-on letters and sports Crystalette. |
| 4. |
Cut 3 narrow strips of Bubble Gum Pink Zwade. Fold each in half and staple to narrow end of tag. Add 3-5 crystals to cover the staples. Trim ends of Zwade. |
| 5. |
Punch out tow yellow cardstock stars (or make your won pattern). Trace a star onto the back of Bubble Gum Pink Shimmer Designer Sheet. Cut out pink star with scissors. Add crystals to the stars with Applicator Wand |
| 6. |
Title and Sentiment: Punch out title using Sizzix or other punched alphabet system. Adhere to top of page; add a crystal, randomly, to each letter. Add sentiment to bottom of page, using rub-on letters, incorporating the three stars in the design. |
| 7. |
Apply a small amount of adhesive to the back of the photo and attach it to the page, slipping it under the yellow layer at the top of the page and under the pink layer at the bottom of the page. Add the tags at pleasing angles. If desired, add more crystals to the tags and the page in general. |
| |
|
| Sponsor: Kandi Corp. |
|