Fast and Easy Cards
By Lynell Harlow
|
| Materials
Needed |
 |
 |
LG687 Flying geese brass stencil
|
|
Embossing tool and light table |
|
White or light colored cardstock |
|
One 3/4 “ stencil brush |
|
Paper towels |
|
Pigment ink in a variety of colors |
|
Several 1/4 “ stencil brushes |
|
Fiberglass screen for faux cross stitch |
|
LL513 Torch ginger flower brass stencil |
| |
|
| |
|
| |
|
| |
|
| |
|
| |
|
| |
|
| |
|
| |
|
| |
|
| |
|
| |
|
| |
| Instructions |
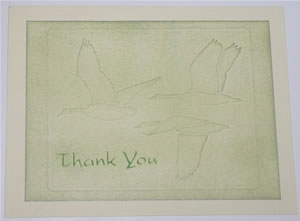
| Card #1 Strié Flying geese (LG687 |
| 1. |
Tape the geese stencil to the front of the light colored card stock and turn the stencil face down onto the light table and dry emboss this paper using an embossing tool. |
| 2. |
Remove the stencil from the paper. |
| 3. |
Load a ¾” stencil brush with your favorite color pigment ink. |
| 4. |
Starting at one side, pull the loaded stencil brush halfway across the dry embossed design in a straight line. Repeat this motion all the way across the side of the card in as uniform a manner as possible. The effect of the color hitting the dry embossed image creates the streaks of pigment, thus the name of the technique “strié”. This is a French word for striation. |
| 5. |
If you repeat this “striping” technique on all four sides of the card, it creates a linen look with the color. For variation, use more than one color, using a different brush for each color you use. |
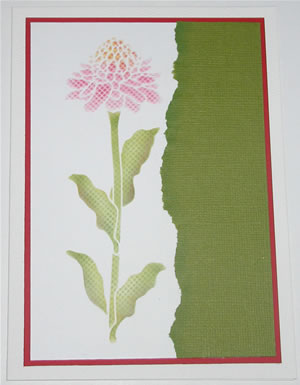
| Card #2 Faux Cross-stitch Flower (LL513) |
| 1. |
Tape the flower stencil to the front of light colored card stock and turn the stencil face down onto the light table and dry emboss this paper using an embossing tool. |
| 2. |
Turn the card face up in front of you and tape out al the edges of the stencil. Next, use a dry brush technique to stencil the flower a pale pink, using a ¼” stencil brush and pigment ink. Be sure, if you are using a very wet ink, to get the excess wetness out of the brush onto a paper towel – this is called a ”dry-brush technique”. Then, using a fresh ¼” stencil brush, make the leaves yellow or pale green again use the dry brush technique. |
| 3. |
Angle the fiberglass screen on top of the brass stencil and hinge it onto the card stock with a single piece of removable tape. This hinged piece of tape will make it possible to lift the screen and see if you are stenciling it dark enough without shifting the grid lines being created on the flower because the gray color of the screen will make it hard to know how much color is going onto the design underneath. You can use the same brushes but, again, have a paper towel handy for the dry brush technique. Use the pink brush, but now use it to stencil a deeper red color red onto the flower. |
| 4. |
Use the yellow or light green brush to stencil a darker green color through the screen. Start with a light pressure and stencil darker after peeking under the screen to see if more color is needed. |
| 5. |
Continue adding depth of color until your are satisfied with the intensity. When you remove the screen, the grid will have created the look of cross stitching. |
| |
|
| Sponsor:
Dreamweaver Stencils |