Sweet Girl
By Jennifer Davis
|
| Materials
Needed |
 |
 |
Fiskars® UltraShape Xpress Shape Cutter
|
|
Fiskars® Fabric Applique Templates for Shape Cutter |
|
8” stretching frames |
|
14” stretching frames |
|
Heavy blue denim |
|
Dark pink floral fabric |
|
Pink paisley fabric |
|
Checkered fabric |
|
Yellow fabric |
|
Light and dark green floral fabric |
|
Pink ribbon |
|
White letter stickers |
|
White cardstock |
|
Hat pin |
|
Brad |
|
Tissue paper |
|
Photograph |
|
Zots |
|
Steam-a-Seam2 |
|
Paper piercer |
|
Wide paint brush |
|
Iron |
|
Staple Gun and staples |
|
Decoupage glue |
| |
| Instructions |
| Part 1: Assembling Wall-Hanging Canvas – not necessary to show on camera |
| 1. |
Assemble frame, staple at corners with staple gun
|
| 2. |
Stretch blue denim fabric over frame, stapling on outside edges |
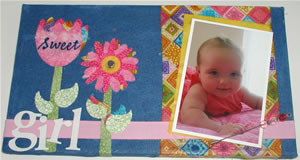
| Part 2: Decorating Blank Canvas |
| 3. |
Attach large checkered fabric piece with staple gun approximately one inch from right side. |
| 4. |
Place pink ribbon across bottom of canvas, staple in place on back of frame |
| 5. |
Lay yellow photo “mat” piece onto checkered fabric. |
| Part 3: Cutting Appliqué Flowers |
| 6. |
Iron Steam-a-Seam2 (a stabilizer) onto back of all appliqué fabric pieces.
Note: To iron stabilizer onto fabric, pull one side of paper backing away from stabilizer, place rough side against wrong side of fabric, press with hot, dry iron. |
| 7. |
Cut all flower pieces.
Note: Cut with fabric face down with the paper backing still on. Using the Shape Cutter with fabric takes a little practice. Plenty of extra stabilized fabric included for this. Cutting the fabric dulls blades very quickly. If having problems, first adjust blade depth – then if problem persists, replace blade.
- Cut 3 tulip pieces, one in dark pink, pink paisley, and checkered.
- Cut 2 daisy pieces, one in dark pink, one in checkered.
- Cut 1 daffodil piece with pink paisley
- Cut 2 green stems
- Cut 4 light green leaves (2 of each side)
- Cut 2 checkered leaves
|
| Part 4: Assembling Appliqué Flowers – all pieces can be laid on the canvas for this step. The paper backing can be peeled off and will hold flower pieces in place until decoupage step is completed. |
| 8. |
To assemble tulip, layer dark pink, checkered, and paisley tulip pieces together at angles. |
| 9. |
Line up the bottom of one stem with the bottom edge of the canvas about two inches from the left edge. |
| 10. |
Place the tulip pieces at the top of the stem and the leaves about halfway down the stem. |
| 11. |
To assemble daisy, layer the paisley daffodil over the checkered daisy. Place the dark pink daisy and the flower center on top. Adjust flower so that all petal colors show. |
| 12. |
Layer checkered leaves and green leaves halfway down the stem. |
| Part 5: Decoupage |
| 13. |
Place “girl” stickers on bottom left edge. |
| 14. |
Place tissue paper-printed “sweet” over tulip. |
| 15. |
Generously brush Decoupage glue over entire canvas. Use fingers to press out bubbles. Brush under edges of pieces if needed. Tissue paper will blend into tulip as the glue dries. |
| Part 6: Finishing Touches – once the canvas is dry |
| 16. |
Mat photo on white cardstock. |
| 17. |
Attach photo and mat to right side of canvas at angle. |
| 18. |
Gently poke hole in center of daisy and insert brad. |
| 19. |
Attach the hatpin with dimensional glue dots. |
| |
|
| Sponsor:
Fiskars® |