Collecting the Sounds of your Memories
By Judy Coltman
|
Adding sound to your
scrapbook and projects adds a whole new dimension to the preservation
of your memories. Do you have video tapes of your children when
they were younger, audio tapes of your parents' or grandparents'
voices or CD's of your favorite music? All of these sounds can
be put into a format that can be added to your scrapbook. Once
the sounds are added, it's as easy to listen to those memories
as it is to look at your photos. Any sound you have, in any format,
can be added to your scrapbook. |
| Materials
Needed |
|
 |
Sound Stripes kit |
| Instructions
|
First, here's how to make a recording
in a format that can go into your scrapbook.
MAKING A RECORDING OF YOUR VOICE:
|
| 1. |
Choose any label. |
| 2. |
Align the label with the recess in the bottom of
the recorder. With the label aligned, push the red record button
momentarily. |
| 3. |
Remove the label and then push and hold the record
button with the Sound Stripes recorder about 3" from your mouth.
|
| 4. |
When the red light turns on, begin speaking. Keep
pushing the record button until you have finished. |
| 5. |
Push the green play button to review your message. |
| 6. |
If the message is what you want to keep, peel the
archive tab off the label (the last black rectangle on the label).
If you want to re-record the message, repeat steps 2-4 before removing
the archive tab. |
| 7. |
Adhere the label to the page protector of your page
by peeling back the numbered tab at the top of the label and removing
the backing sheet. |
|
|
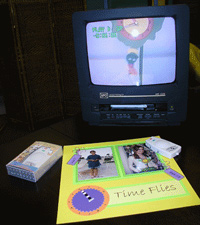 Now here's how to use the sounds you already have and get them
ready for your scrapbook:
Now here's how to use the sounds you already have and get them
ready for your scrapbook:
MAKING A RECORDING FROM ANOTHER SOURCE—
VIDEO TAPE, AUDIO TAPE, CD, ETC: |
| 1. |
Put the video tape or audio tape into a player. Play
the tape or CD until it is a few seconds before the portion you
wish to record for your scrapbook. Pause the player. |
| 2. |
Align the label with the recess in the bottom of
the recorder. With the label aligned, push the red record button
momentarily. After you hear the tone that means the label was read
correctly, remove the label. You have up to 8 seconds to begin your
recording. |
| 3. |
Now hold the front of the recorder about 3-4 inches
away from the speaker of the TV or tape/CD player and start the
player. |
| 4. |
A second or so before you get to the part you want
to record, push and hold the record button to make the recording.
Release the button to end the recording. Stop the player. |
| 5. |
Now push the green play button to review your message. |
| 6. |
You may have to record again to get the message and
the quality you want. Adjust the loudness of the recording by adjusting
the speaker volume of the player rather than by moving the recorder
further away from or closer to the speaker. |
| 7. |
Once you have the message you want to keep, remember
to archive the label so that you won't accidentally use it to make
a different recording. |
|
| Sponsor:
Sound Stripes |