Stenciling with Bleach and Ink Sprays
By Lynell Harlow |
Some of the most fun
in scrapbooking can be had in starting and completing a small
project in one day! This “topless” album is just such
a project and the extra good news is, it’s also what I call
a “two-fer.” From one 6x6 post-bound album, you get
two mini-albums. Here’s how you do it: |
| Materials
Needed |

|
 |
Undiluted bleach in a fine mist spray
bottle |
|
Two colors of ink spray |
|
Pigment ink pads slightly darker
in color to complement the ink sprays |
|
1/4" stencil brush |
|
Paper towels |
|
LJ849 tree silhouettes Dreamweaver
brass stencil |
|
LG687 flying geese Dreamweaver brass
stencil |
|
White or light colored card stock
to spray the colored inks onto |
|
You will also need a variety of dark
colored card stock to do the bleaching on. Each color of paper bleaches
differently, so you will want to experiment to discover which ones
bleach the best. |
| |
| Instructions
|
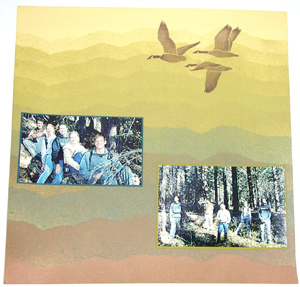
Stenciling backgrounds
with bleach: (LJ849 trees)
To create the tree silhouette, position the LJ849 tree background
stencil onto the card stock. Hold the bleach filled spray bottle
18-24 inches above the stencil. To spray a fine mist, give the
atomizer one downward plunge with your finger. If you want larger
droplets, pump the atomizer up and down quickly. Immediately remove
the stencil and rinse it with water. To dry it off, place it on
a paper towel and gently blot it. Let the bleached card stock
dry for a couple of hours before working with it again.
Stenciling with ink sprays and pigment ink pads: (LG687 flying
geese)
|
| 1. |
Choose a pale colored card stock and hold the ink
spray bottle 18-24 inches above the paper and spray a fine mist
of color. Again, just one downward plunge of the atomizer will make
the droplets fine. Larger droplets are achieved by pumping the atomizer
up and down quickly. Now, center the stencil onto the paper and
do the same misting or spritzing above the stencil, letting the
mist fall rather than trying to direct the mist into the holes of
the design. Remove the stencil and wipe it clean while the ink is
drying on the paper. |
| 2. |
Reposition the clean stencil onto the now dry stenciled
geese design. Pick up a small amount of darker colored ink from
the pigment ink pad and off-load the excess wetness onto a dry paper
towel. This dry-brush technique will keep the ink from running under
the stencil and causing a blurred image. Use a rouging circular
motion to apply pigment around the edges of each of the flying geese
to define and enhance the image. |
| |
|
| Sponsor:
Dreamweaver Stencils |
|