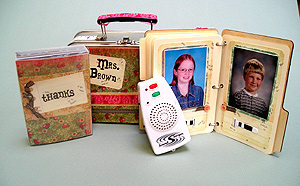
Teacher's Gift with the Voices of the Students
by Julie Arsenault
Presented by Sherry Cook
|
Tip: For this project,
we chose to keep the design of each page simple and clean. This
design allows the photo and voice of each child to highlight the
pages. |
| Materials
Needed |
(Click to here to listen
to a sample)
|
 |
Sound Stripes kit |
|
Lunchbox
|
|
Wooden File Folder Kit |
|
Manila cardstock |
|
Paper, including notebook styled
paper |
|
Ribbon |
|
Buttons |
|
Photos of each student |
| |
| Instructions
|
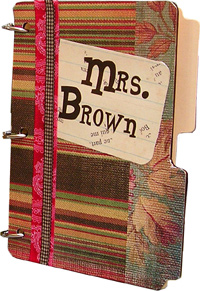
ALBUM: |
| 1. |
Cover outside of Wooden File Folder with patterned
paper. Ad Rub-ons and ribbon. |
| 2. |
Using the file insert in the kit as a guide, cut
pages for the album out of manila cardstock, rounding corners. One
side of a page will be needed for each student in the class. |
| 3. |
Cut out notebook paper just slightly smaller than
the page and adhere. Ink the edges of the notebook paper. |
| 4. |
Cut out mats for the photos, rounding the corners. |
| 5. |
Embellish with ribbon and buttons. |
| 6. |
Use binder rings to holds the album together. |
| |
|
| COLLECTING THE
VOICES: |
Use the Sound Stripes
kit to collect a voice message from each of the students. Each
student will have the opportunity to thank the teacher and say,
in their own words, what they liked best about that year in school.
|
| 1. |
Align the label with the recess in the bottom of
the recorder. With the label aligned, push the red record button
momentarily. |
| 2. |
Remove the label and the push and hold the record
button with the Sound Stripes recorder about 6" from the students
mouth. |
| 3. |
When the red light turns on, the student can begin
speaking. Hold the record button down until they are finished. |
| 4. |
Push the green play button to review their message. |
| 5. |
If the message is ready to keep, peel off the archive
tab off the label (the last black rectangle on the label). If the
student wishes to make a different recording, repeat steps 1-4 before
removing the archive tab. |
| 6. |
Adhere the label below the students' picture by peeling
back the numbered tab at the top of the label and removing the backing
sheet. |
| |
|
FINISHING TOUCHES: |
| 1. |
Decorate the Sound Stripes box to match the album
by removing the insert that came with the kit and using it as a
template to make a new insert. Use the same papers and embellishments
that are in the album. |
| 2. |
Decorate the lunchbox tin to match the album and
Sound Stripes box. The tin makes a great storage case for the project! |
| |
|
| Sponsor:
Sound Stripes |