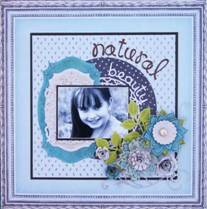
Natural Beauty
by Tina McDonald
Supplies:
Spellbinders™ Grand Calibur® Machine, LF-114 Grand Circles, S5-077 Labels Twenty Five, S5-083 Antique Frame and Accents, S5-086 Bitty Blossoms, S5-067 Anemone Flower Topper, S5-102 Aster Flower Topper, S4-354 Splendid Circles, S4-328 Foliage
GCD Papers: “ELLA BLUE” 12x12 patterned paper pad
My Mind’s Eye: “ON THE BRIGNT SIDE TWO” 6x6 patterned paper pad
“MISS CAROLINE” Fiddlesticks “Story” Plaid, “LOVE” Journal paper
Echo Park: “LITTLE GIRL” Leaf patterned paper
Want2Scrap: Baby Bling “Le Crème”, large double flourish
Bazzill Basics: Cardstock Black
KaiserCraft: Pearl Brad
Doodlebug: Alpha Stickers
Ranger Ink: Distress Ink “Frayed Burlap”
Glue Dots: Adhesive Glue Dots
Beacon Adhesives: Zip Dry Paper Glue
Instructions:
- Use Ella Blue patterned paper with frame as background paper.
- Trim black cardstock to 8 x 8”. Trim patterned paper slightly smaller. Adhere to cardstock. Adhere to center of page background.
- Using LF-114 Grand Circles #3 (#1 is the smallest), cut and emboss patterned paper with Spellbinders Grand Calibur die cutting machine. Adhere to page.
- Cut/emboss S5-077 Labels Twenty Five #5 with turquoise paper. Leave the paper inside the die template and apply Frayed Burlap ink through the openings in the die template like a stencil. Adhere to left side of Grand Circle.
- Cut/emboss frame from S5-083 Antique Frame and Accents set. Leave the paper inside the die template and apply Frayed Burlap ink through the openings in the die template like a stencil. Adhere die cut to center of Labels Twenty-Five die cut.
- Cut/emboss S4-354 Splendid Circles #4. Leave the paper inside the die template and apply Frayed Burlap ink through the openings in the die template like a stencil. Adhere die cut to page.
- Trim Want2Scrap flourish in half. Put the 2 cut ends together, overlapping and adhere to bottom right corner of inside square.
- Cut/emboss four S5-086 Bitty Blossoms, medium die. Leave the paper inside the die template and apply Frayed Burlap ink through the openings in the die template like a stencil. Roll from the outside to the inside. Adhere with a Glue Dot. Curl petals in the outer rolls for a realistic appearance. Ink edges if desired.
- Cut/emboss two S4-328 Foliage, 5 leaf die, from the Echo Park’s LEAF green paper. Leave the paper inside the die template and apply Frayed Burlap ink through the openings in the die template like a stencil.
- Cut/emboss S5-102 Aster Flower Topper, center, small and medium flowers. Leave the paper inside the die template and apply Frayed Burlap ink through the openings in the die template like a stencil. Curl all edges around a pencil, upwards. Separate layers on the Aster pieces. Adhere together with petals between the two below it. Adhere flower center. I chose to add one of the Bitty Blossoms to this flower center.
- Repeat step 9 using S5-067 Anemone Flower Topper set. Add brad to center if desired.
- Cut/emboss two S5-067 Aneome Flower Topper, medium flowers, with Echo Park LEAF green paper. Stencil as above, curl around pencil upwards. Use these as a bottom layer for the flowers in step 10 and 11.
- Assemble flowers from steps 8-10 in a desirable fashion and adhere, adding Foliage die cuts as desired.
- Add alpha letters to create title.
- Add pearls as desired.
Tip: To roll Bitty Blossoms and Spiral Blossom die cuts, use a quilling tool or a skewer.
|