

Layout supply list:
PA396 - Wreaths of Glory - 2 sheets
PA392 - Kraft Damask - 2 sheets
PA395 - First Class Mail - 1 sheet
GN561 - Attic Treasures Sticker Banners
GN297 Cream Pearl Embellishments - you will need 4 pearls
GN341 Mini Bag & Tags - you will need 3 large envelopes
BR008 Black Ice Broach – 1
GN530 Pom Pom Trim - Cream - about 22 inches
WB001 – Tinsel – 2 inches
CX860 - butterfly resin
GN350A - tarnished silver glitter
GN568 - alphabits stickers
GN381 – White and Cream Crepe Paper – 14” x 1.5” strip
GN285 – White Mica
Ink for distressing, creme seam binding.
DIRECTIONS:
- From your graph paper, cut 2 strips. One measuring 10.5” wide by 1” high and the other strip measuring 9” wide by 1” high. Scallop one edge of both strips using your favorite decorative scissors.
- Cut two pieces of the kraft brocade paper. One should be 10” high x 11” wide and the other should be 10” wide by 10” high. Distress the sides of the paper using your scissors, then your favorite brown ink.
- Glue the kraft brocade paper onto the wreaths of glory paper, place them to the inside edges so that they meet at the center of the double page layout and have equal distance from the top and bottom. The larger kraft damask paper will be placed on the left side of the layout. (TIP: do not apply glue close to the bottom edge of the kraft damask paper so that you will be able to slide the scallop edged graph paper under the edge of the paper.)
- Take the 2 scalloped edged graph paper strips that you created in step 1, distress the scalloped edge and slide them under the kraft damask paper. Make sure the your strips line up to the inside edges of your layout and line up on both pages.
- Take 3 of the large envelopes from the envelopes and tag package distress around the upper third of them and tie cream seam binding through the holes of the tags. (TIP: To create crinkle seam binding, simply wet seam binding and crunch up. Then let dry! To further distress, ink while wet.) Glue the envelopes to the right kraft damask paper. You will want to glue them down so that they are about ½ inch in from the right edge of the kraft paper, and about 1.5 inches UP from the bottom of the kraft damask paper.
- Print your photos and trim them so that they have a white border around them. (Photos used in layout are: Left size: 10.25” wide x 5.75” high including white border, Right side (3 photo collage): 7.5” wide by 7” high.
- Cut two pieces from the first class mail paper. One should be 10.25” wide x 2.75” high. The other should be 7.5” wide x 1.5” high. (Make sure that your first class mail patterned paper is the same width as your printed photos. If the two pieces are not, trim them to size.)
- You will want to glue the photos and papers so that the bottom of the patterned paper on the left page lines up with the bottom of the photo on the right page. And the top of the patterned paper on the right page should line up with the top of the photo on the left page.
- Now, glue the photos and patterned paper to the kraft damask.
- Using your alphabits stickers, put a title on the left page beneath the large photo.
- Using double sided tape, apply a line of glass glitter below the title on the left page and to the upper right side of the edge of the kraft damask paper on the right page.
- Cut and Glue cream pom pom trim at the bottom of the patterned paper on the left page and at the bottom of the photos on the right page. (If your photos are the same size as the sample layout, your pom-pom trim can be cut to: Left side – 7.5” wide & Right side – 10.25” wide.)
- Apply 3 pearls horizontally to the lower right of the edge of the kraft damask paper on the right page.
- Stick the ‘happy’ sticker from the sticker book below the envelopes on the right page.
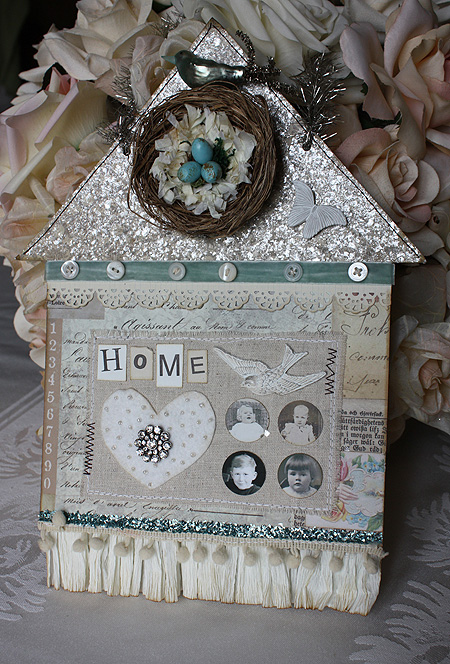
- Stick the ‘life is wonderful’ banner sticker onto the upper right edge of the photo on the left page. Place a cream pearl at the right edge of the sticker banner.
- Using the white crepe paper, cut a 14” wide x 1.25” high strip. Using a needle and 20” white embroidery thread, create a straight stitch going in and out on one edge of your crepe paper strip, staying about 1/8” in from the edge. When you reach the end of your strip, slide your needle off the thread. Using the excess thread, tie a double knot and pull tight so your crepe paper becomes a circle. (TIP: Using a friend's finger always help when making the knot tight!)
- Spray your crepe paper flower with spray adhesive and then sprinkle white mica on top. Shake off excess. (TIP: You can re-use your excess mica, if you put a cutting mat or piece of paper, under your crepe paper flower when spraying.)
- Glue your crepe paper flower to the left corner of your large photo on the left side of the layout, as shown in sample. Glue 2” of silver tinsel to the center of your crepe paper flower. Then glue your Black Ice Brooch to the center of the tinsel.
- Glue two of the butterflies to the layout as seen on the sample or as desired.
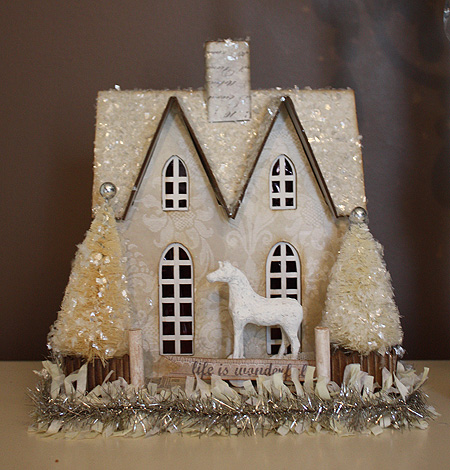
House wall hanging supply list
GN598 - House Backdrop – 1
PA396 - Wreaths of Glory - 1 sheet
PA197 Alma paper - 1 sheet
PA395 - First Class Mail - 1 sheet
PA393 - Madonna Collage - 1 sheet - you will punch the baby face out of this one.
PA391 - Hope Chest - 1 sheet, you will punch the baby face out of this one as well.
GN378 GN598 - House Backdrop 1 sheet
BR008 Black Ice Broach – 1
GN568 - Alphabits Stickers – 1
GN381 - Crepe paper - white and cream assortment
GN530 Pom Pom Trim - Cream - about 12 inches
GN350B Glass Glitter Caribbean Aqua
GN528 - nest – 1
CX830 Soaring Bird – 1
GN466 Tissue Paper Garland - Cream/Yellow & White - about 4 inches or so to glue into the nest.
WB027 - Box of 6 Glass Birds - one bird for the top of the nest
WB001 - Old Fashioned Rope Tinsel
Other: a few eggs to put into the nest, about 12 inches of velvet ribbon - you should match the velvet ribbon color to whatever glass glitter you will use, 6 buttons, 2 images of family members to punch, a circle punch to punch the baby faces, a scrap of muslin, a scrap of white felt to make a heart, some white beads, an ink pad.
|