|
| 211-2 | Print | Close [X] |
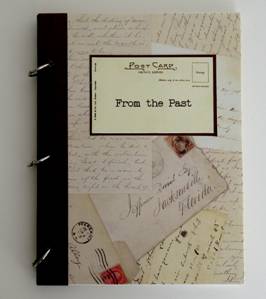
| Julie McGuffee makes an album just for postcards. |
For More Information Visit: www.elmers.com www.xacto.com |
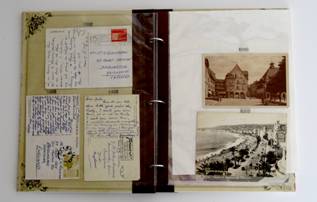
Scrapbook Soup Postcard Journal By Julie McGuffee I used to collect postcards, but needed special album for them – I wanted to be able to read the back of the card as well as enjoy the picture on the front. This is what I came up with.
For this project you will need: 1. Cut the foam board along the center fold to create two pieces for the back and front of your journal. 2. Using the glue stick, liberally cover one side of one piece of foam board with glue. Aligning the edge of one piece of paper with the left edge of the foam board, press in place. Wrap the excess around to the back. Cover the back of the excess paper with glue then press in place at the back. Repeat the process with the second piece of foam board, but this time align the paper with the right edge of the foam board. 3. Trim 2 additional pieces of scrapbook paper to 12x8 ½”. With outside edges aligned, glue one piece to the back of each piece of foam board. These will be the front and back covers of your journal. 4. Cut two, 4” wide strips of 12” card stock. Fold in half then, using the glue pen, glue around what will be the inside edge of each cover. Tip: Glue one half of the strip to the front first. Let dry then pull the excess around the edge of the foam board. Spread glue onto the excess card stock then press in place at the back. 5. Cut the white edge (with the holes) away from the page protector along the seam. Cut one 12” x 5/8” strip of card stock for each page protector then glue along the edge next to the seam with double stick tape. 6. Using the holes of the page protector as a guide, create a template on a sheet of white paper by marking where the holes should be about ¾” from the edge. Place the template on top of the cover. Secure with a rubber band then punch 3 holes in the cover. Repeat for the back cover. 7. Place the template over 3 or 4 page protectors. Hold in place with bulldog clips (place them between where the holes will be) then punch holes in the page protectors about ½” from the edge, through the cardstock reinforcement strip. 8. Place postcards inside the page protectors one at a time. Keep in place by placing a decorative staple through the page protector above each postcard. Do not staple the postcards! 9. Stack the front and back covers together with the page protectors between then secure with rings. Not just for postcards, you can use this technique to make any size album for any occasion!
Happy Crafting!
|
Julie Fei-Fan Balzer & Julie McGuffee |
|