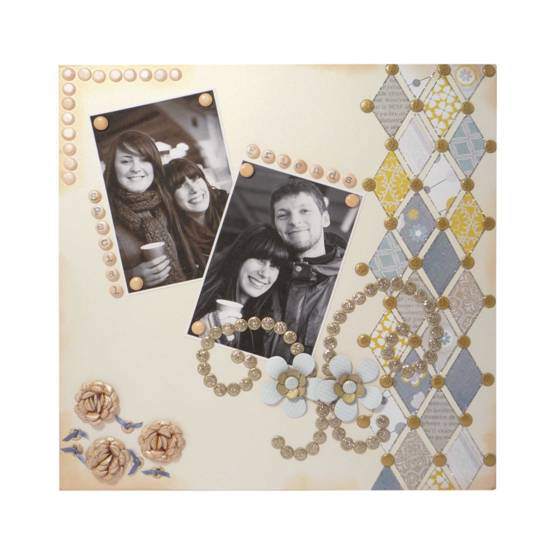
Craftwork Cards Limited Scrapbook Layout
Designed by Julie Hickey
Materials:
Cardstock for layout base
Patterned Papers
Glitter Glue: Platinum
Candi: Tungsten
Candi: Icing Sugar
Candi: Gold Leaf
Candi: Baker Street
Candi Fix foam pads
Candi Alphabet Stamps
Acrylic block
Dye-based ink pad – black
Distress ink pad – Tea Dye
Blending Tool
Die cut flowers
Ribbon
Hole punch
1” Circle punch
Glossy Accents
Adhesive to attach papers and photographs
How to make layout:
Cut assorted patterned papers into diamond shape. I made a diamond template from cardstock and traced around it onto the reverse of my papers. Cut out enough diamonds to create panel for layout and adhere in place.
Edge the diamonds with glitter glue, using the edge of the paper as a guide as it will keep the glitter glue straight. Leave to dry.
Attach Candi Fix foam pads between each diamond, remove backing paper and cover with Tungsten Candi.
Crop photographs to size and adhere to layout.
Colour Candi by attaching Icing Sugar Candi to work matt using Candi Fix foam pads. Ink up blending tool with Distress Ink Pad – Tea Dye and gently colour the required number of Candi to spell you message.
Attach coloured Candi to layout using Candi Fix foam pads.
Apply Alphabet stamps to acrylic block and using black ink stamp out each letter onto the coloured Candi and leave to dry.
Colour some Candi using Tea Dye ink pad and attach to corner of photographs using Candi Fix foam pads. Squeezing gently add a layer of Glossy Accents all over top of Candi and leave to dry.
Attach Icing Sugar Candi to top left corner of you layout using Candi Fix foam pads.
Ink up blending tool with Distress Ink Pad – Tea Dye and gently rub over Candi, colouring both the Candi and the edge of your layout. Continue randomly colouring areas of layout edge until happy with how it looks.
Create a swirl pattern on layout using Candi Fix foam pads, remove backing paper and cover with gold leaf Candi. Apply a coating of glitter glue to top of each piece of Candi and leave to dry.
Create centres for die cut flowers by gluing one Candi piece upside down like a cup in the centre of a die cut flower. Apply Glossy Accents around edge of centre Candi piece and attach upside down Candi to the edge, 5 or 6 petals will fill around the centre Candi piece.
Add contrasting Candi to centre, fixing in place using Candi Fix foam pads.
Create Candi Roses following these easy steps:
- Start with a punched 1” circle of card to make a base for the rose. Curl and shape the Candi so each petal has a slight turned back lip to it.
- Apply Glossy Accents to centre of circle. Attach 2 pieces of shaped Candi to centre and leave to dry for a few seconds.
- Apply Glossy Accents at either end of the 2 centre pieces and attach 2 further pieces of shaped Candi.
- Continue building Candi rose centre, attaching each shaped petal using Glossy Accents and off setting each petal.
- Once centre is created add more shaped petals around the edge, a layer at a time until the punched circle is covered and flower is desired size.
Repeat these steps to create required number of Candi roses.
To create buttons from Candi simply punch 2 holes in centre – I used a Japanese Screw punch but you could use a pokey tool to pierce the holes.
Thread with ribbon, tie at front and attach to layout using Candi Fix foam pads.
|