SUPPLIES
Project Life Style A Page Protectors
Project Life 3x4 Grid Cards
Die Cuts With A View The Snapshot Stack
We R Memory Keepers Corner Chomper
Close To My Heart Orange Ink
Scissors
Metal Rimmed Circle Tags
Technique Tuesday Good Days Stamp Set
Tim Holtz/Tonic Scissors
Tsukineko Brilliance Starlite Silver Ink
Basic Grey Star Metal Studs
American Crafts Precision Pen
Paper Trimmer
Tim Holtz Tiny Attacher Stapler
Sakura Gelly Roll White Pen
Kelly Purkey Alphabet Stickers (Simon Says Stamp)
EK Success 1 Inch Circle Punch
Rolling Date Stamp
Scotch Rolling Adhesive
STEP BY STEP
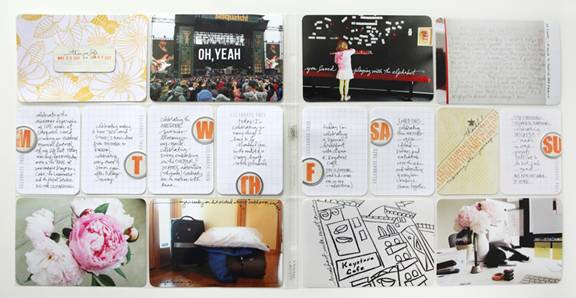
1. Begin with two Style A Project Life Page Protectors (a left and a right side to create a 2-page spread).
IDEA NOTE/DISCUSSION TOPIC: This is a one-week spread. I use the same page protectors each week and sometimes add inserts if I want to include more content.
2. Print seven 4x6 photos. I often do one per day but not always. Some weeks I print them all at once at the end of the week and other times I print them daily.
3. Round the corners. Slip into pockets or lay on top of pockets as a way to “see” what’s happening on your spread.
4. Create one 4x6 date card to be placed in the top left corner pocket (of the first page). Cut one piece of pattern paper from The Snapshot Stack to 4x6.
5. For the date, cut a rectangle from a different piece of pattern paper to 3 inch x 1 inch and round the corners. Use a rolling date stamp to add the dates of the week. Ink edges. Stamp “celebrate this” sentiment and hand-write “this is life.”
5. Create 7, 3x4 journal cards. To do this I created a design “formula” and repeated it on each of the cards. Start with 7 of the 3x4 grid journal cards from Becky Higgins or create your own with pattern paper or cardstock.
IDEA NOTE/DISCUSSION TOPIC: I love the idea of having a journaling theme for the week. This week the theme was “celebrate this” where I documented one thing each day that was worth celebrating (there is always something). Another great theme would be gratitude or thankfulness. I also LOVE repetition.
7. Cut a strip of pattern paper 1.5 inch x 12 inch. Stamp each of the days of the week from the Good Days stamp set. Punch using a 1 inch circle punch and then adhere into/on top of the metal rimmed circle tags.
8. Adhere metal rimmed tags to journal cards using rolling adhesive. Use Tim Holtz scissors to cut part of the edge off after adhering. Move them around so that there are not all on the same place on the cards (some on the left, some of the right, near the top or near the bottom).
9. Using silver ink, stamp the sentiment “celebrate this” on each of the tags.
10. Handwrite your journaling (what you are celebrating) on each card. Think about big and small things you might be able to celebrate in your life on that particular day.
IDEA NOTE/DISCUSSION TOPIC: I like to have a scratch piece of paper to test out my pens/get them flowing before I add them to my projects or photos.
11. Create one more 3x4 card for the empty pocket by choosing one of the pattern papers from The Snapshot Stack. Round the corners. To create a design on my extra card I repeated the sentiment “this is life” in three diagonal strips and then hand-wrote
12. Embellish photos. Use a pen to hand-write directly onto photos (either white or black ink depending on the photo) or cut banners from The Snapshot Stack.
For more information visit:
aliedwards.com
|