Celebrate Card
Designer: Susan Cobb
Presented by Sara Naumann
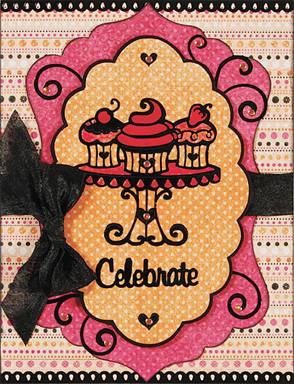
Designer’s Tip: I layered Glaze Pen colors together to achieve different shades of pink and red inside the stickers. Let the first layer of color dry thoroughly, then gently tap the point of the next color pen on a piece of scrap paper to ensure it will “flow” on smoothly over the first color. Apply the color letting it float on top of the dried first color—do not try to mix the second color with the first one.
Supplies:
- Grapefruit Paper Pack by Hot Off The Press
- 3/4" wide black crepe ribbon
- Design Tool Kit #3 template by Hot Off The Press
- Hey Cupcake! Dazzles™ by Hot Off The Press
- Pink Jewel Dazzles™ by Hot Off The Press
- 5”x6 1/2” blank white card
- Sakura Glaze Pens (Bright set)—rosy pink, red, white
- Black Cardstock
- Black ink pad
- X-acto® knife (helpful for placing Dazzles™)
- Zots™ Adhesive Dots
- Foam Tape
Instructions:
- Place your card with the fold at the left. Cover with Grapefruit orange/pink/black dotted stripes paper. Ink the edges black. Place the scalloped border Dazzles™ stickers along the top and bottom edges of the card, trimming the sides evenly.
- Use the template to trace and cut out an Elegant Label shape from Grapefruit dark pink textured paper. Ink the edges black and glue centered on the card front. Glue a 5” length of black crepe ribbon centered across the dark pink label.
- Use the template to trace and cut out a Scalloped Oval shape from Grapefruit orange/ivory dotted paper. Mat on black cardstock with 1/16” borders. Turn the shape vertically. Place the cupcakes/cake stand Dazzles™ sticker centered on the shape, 1” from the top. Place “Celebrate” Dazzles™ centered below the cake stand, 1” from the bottom.
- Place the orange dotted shape on a level surface to color in the Dazzles™ sticker so the ink stays in place. Color in the frosting for the center cupcake with the rosy pink Glaze color and let dry thoroughly. Take the white Glaze pen and gently tap the point on a piece of scrap paper to ensure that the ink is flowing well. Apply the white Glaze ink over the top of the dried pink color, allowing it to “float” over the dried pink ink without mixing the two colors together. Let dry.
- For coloring in the frosting on the two smaller cupcakes and the cake stand, use the technique in step #4, but use white Glaze for the first color, and a very thin layer of rosy pink Glaze for the second color. For the cherry and strawberry, use red Glaze for the first color, then rosy pink Glaze for the second color. Let dry.
- Place the orange dotted scalloped oval centered over the dark pink label shape. Place swirl Dazzles™ stickers on the dark pink label near the edges of the scalloped oval as shown, tucking the excess beneath the oval.
- Foam tape the oval centered over the dark pink label. Add heart Dazzles™ stickers to the top and bottom of the oval, and centered on the cupcake liners. Embellish the hearts and swirls Dazzles™ stickers with Pink Jewel Dazzles™. Tie a black crepe bow and Zot™ near left edge of the oval.
Thank You Card
Designer: Susan Cobb
Presented by Sara Naumann
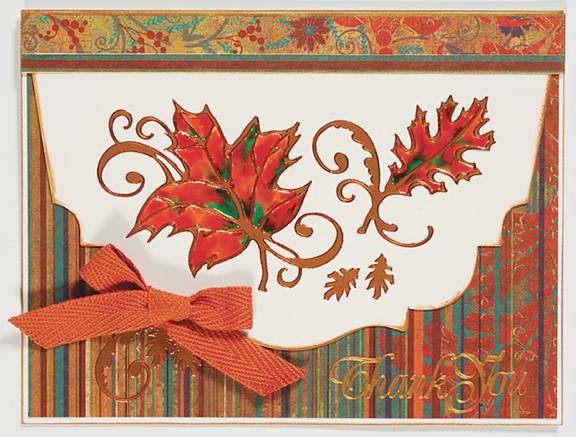
Designer’s Tip: To fill in the Copper Autumn Splendor Dazzles™ on glossy white cardstock, I used two colors of ink placed next to each other and let them “flow” together to mix slightly for a pretty affect. I alternated the pens and worked quickly—they dry rather fast on the glossy cardstock--so keep working the two colors as you go along, filling in one section of the leaf at a time.
Supplies:
- Rich & Spicy Paper Pack by Hot Off The Press
- 1/2" wide rust twill ribbon
- Design Tool Kit #4 template by Hot Off The Press
- Copper Autumn Splendor Dazzles™ by Hot Off The Press
- Gold Greetings Dazzles™ by Hot Off The Press
- 5”x6 1/2” blank white card
- Sakura Glaze Pens (Basic set)—orange, spruce green
- Glossy White cardstock
- Metallic Copper StāzOn® ink pad
- X-acto® knife (helpful for placing Dazzles™)
- Zots™ Adhesive Dots
- Foam Tape
Instructions:
- Place your card with the fold at the top. Cut a 6 3/8”x4 7/8” Rich & Spicy striped paper and glue centered to the card front, even with the fold. Ink the edges Copper.
- Use the template to trace and cut out a Vintage Cutaway shape from glossy white cardstock. Ink the edges Copper and let dry. Glue centered to the card front, even with the fold of the card.
- Cut a 6 1/2"x1/2” strip of Rich & Spicy floral paper and glue to the remaining striped paper with Rich & Spicy teal and burgundy stripes below the bottom edge. Trim along the burgundy stripe then ink the edges Copper. Let dry and glue even with the top edge of the glossy cardstock on the card front.
- Place the large leaf with swirls Dazzles™ sticker angled left near the center of the glossy white cardstock shape. Place a smaller leaf with swirls Dazzles™ to the right as shown. Place the card on a level surface to color in the stickers.
- For coloring in the leaves, first gently tap the spruce green Glaze pen point on scrap paper to ensure a good flow. Repeat for the orange Glaze pen. Apply a small amount of spruce green Glaze ink near the center vein of one section of the large leaf. Now quickly add orange Glaze ink next to the green, filling in the area next to the green. Let the colors mix a bit. Keep moving in the same direction (out from the center), alternating the 2 colors as desired. Fill in one section of the leaf at a time so you’re always working next to wet ink. Repeat until you have completed both leaves. Let dry.
- Ink “Thank You” Dazzles™ sticker with Copper ink and let dry. Place the Dazzles™ sticker on the lower right portion of the card front. Add two small leaf Dazzles™ stickers in the center. Add a swirl Dazzles™ sticker and two small leaf Dazzles™ stickers near the lower left edge of the vintage cutaway shape.
- Use the twill to tie a bow. Zot™ the bow over the top of the swirl and leaf Dazzles™ stickers.
Sending Love Card
Designer: Gail Booth
Presented by Sara Naumann
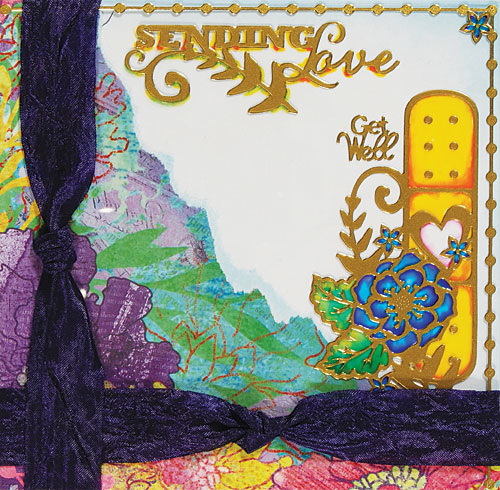
Designer Tip: Color in small areas at a time and apply a second color while the first is still wet to get a blended water-color effect.
Supplies:
- Painted Flowers Paper Pack by Hot Off The Press
- 3/4” purple crepe ribbon
- 8”x8” Happy overlay by Hot Off The Press (or any acetate)
- Gold Get Well Dazzles™ by Hot Off The Press
- Sakura Glaze Bright Set Pens
- Azurite Chalk Ink Pad
- Cosmetic Sponge
- 5”x6 1/2" blank white card
Instructions:
- Place your card with the fold at the top. Cut 1 1/2” from the right edge. Ink the upper and right edges Azurite. Cut a 5” square of the Painted Flowers floral border paper, with the flowers at the lower left corner and tear from the upper left corner down to the lower right corner, keeping corners intact. Ink the torn edge and glue even with the left and lower card edges.
- Cut a 4 1/2” square of acetate and place the “Sending Love” Dazzles™ 1/4” from the upper edge, and the floral band-aid Dazzles™ 1/4” from the right edge. Place the “Get Well” and border Dazzles™ as shown. Place a small flower Dazzles™ at the corner.
- Place the acetate on a flat surface and color in each area starting with the lightest Glaze color, then adding the darker Glaze color on the outer edges. Use yellow and orange Glazes for the band-aid, blue and purple Glazes for the flower, green and teal Glazes for the leaves, white and hot pink Glazes for the heart. Use various colors to add highlights around the lettering. Color in the small flowers. Let dry 5 to 10 minutes.
- Zot™ the acetate even with the upper and right edges of your card. Place a knotted length of ribbon 1/4” from the left and lower edges, gluing ends under the paper.
Holly Ornament
Designer: LeNae Gerig
Presented by Sara Naumann
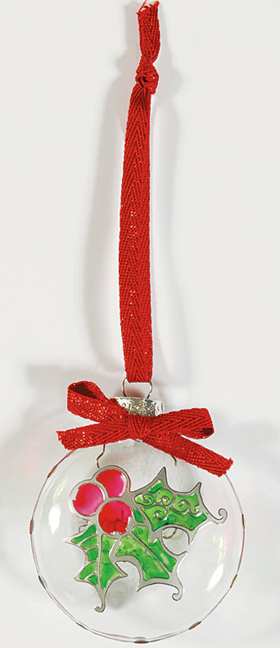
Designer’s Tip: Use an X-acto® Knife to remove Jewel Dazzles® from the backing sheet and place on the Dazzles™ border around the ornament edge.
Supplies:
- Silver Stacked Holly Dazzles™ stickers by Hot Off The Press
- Red Jewel Dazzles™ stickers by Hot Off The Press
- Sakura Glaze® Bright Set Pens
- 2 5/8” wide Glass Disk Ornament
- 1/4” wide red metallic ribbon
- X-acto® pen knife
- Zots™ Adhesive Dots
Instructions:
- Clean and dry the glass ornament to remove any residue. Place a medium size holly Dazzles™ sticker on the center of one side of the ornament. Place the long Dazzles™ border sticker around the ornament sides, starting at one side of the silver ornament cap and ending at the other.
- Use the green Glaze® pen to color the leaves and red Glaze® to color the berries and border. Let dry. Turn the ornament over and use the black pen to personalize with a name and/or date. Let dry.
- Place a medium red Jewel Dazzles™ in each silver dot along the border. Tie a bow and use an adhesive dot to glue to the base of the ornament cap. Thread the hanger with a 9” ribbon length and knot the ends.
Just A Note
Designer: Susan Cobb
Presented by Sara Naumann
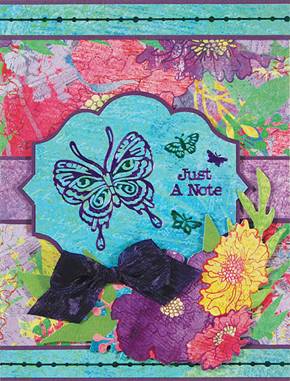
Designer’s Tip: These IDenti-pens are permanent, so they’re great for coloring Dazzles™ stickers! They’re easy to use and have a fine and blunt tip on each pen. I layered the green ink over the blue for a teal color that matches my papers. I like to remove the Dazzles™ stickers from the backing and place on a piece of plastic (such as the clear wrapper for the Dazzles™ stickers) to color them.
Supplies:
- Painted Flowers Paper Pack by Hot Off The Press
- 7/8” wide purple crepe ribbons
- Painted Flowers Die-Cuts by Hot Off The Press
- Layered Labels Template by Hot Off The Press
- Silver Butterfly Dazzles™ by Hot Off The Press
- Silver Tiny Words & Phrases Dazzles™ by Hot Off The Press
- 5”x6 1/2” blank white card
- Sakura IDenti-pens—purple, blue, green
- Purple cardstock
- X-acto® knife (helpful for placing Dazzles™)
- Zots™ Adhesive Dots
- Foam Tape
- Plastic sheet, may use the clear wrapper from the Dazzles™ sheet
Instructions:
- Place your card with the fold at the left. Cover with Painted Flowers floral paper. Cut a 5”x1” Painted Flowers purple textured paper and mat on purple cardstock with 1/16” borders. Glue centered across the card front.
- Cut two 5”x1/2” Painted Flowers blue textured strips and mat each on purple cardstock with 1/16” borders. Glue even with the top and bottom edges of the card.
- Use the template to trace and cut out a Fancy Label A shape from Painted Flowers blue textured paper and mat it on purple cardstock with 1/16” borders. Foam tape it centered over the purple textured paper.
- Place the following Dazzles™ stickers on the plastic wrapper: one large butterfly, two small butterflies, one tiny butterfly. Color the swirls inside the wings of the large butterfly with the blue pen. Color over the blue ink with green. Repeat both colors for the small butterflies and two dotted border stickers. Color the remaining silver portion of the large butterfly, the tiny butterfly, and “Just A Note” with the purple pen.
- Place the colored butterflies and words on the Painted Flowers blue textured label as shown. Add the borders centered on the blue textured strips, trimming the edges evenly with the card.
- Foam tape the floral die-cut to the lower right as shown. Tie a purple crepe bow and Zot™ in place.
Window Card
Designer: Gail Booth
Presented by Sara Naumann
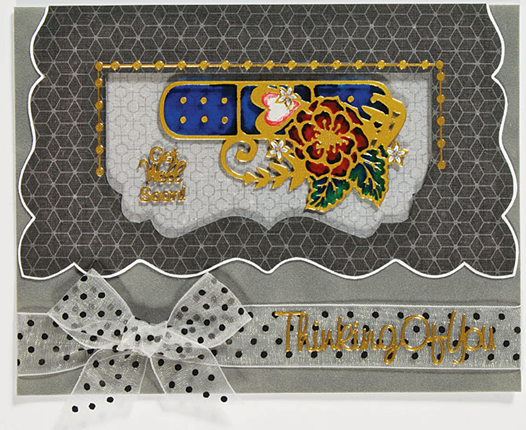
Designer Tip: Color edges dry fast, so work quickly if you want colors to blend.
Supplies:
- 5”x6 1/2” Blank White Card
- Geometrics Paper Pack by Hot Off The Press
- 3/4” wide black dot sheer
- 8x8 Happy Overlay by Hot Off The Press (or any acetate)
- Smoke Suede Paper by Hot Off The Press
- Design Tool kit #2 template by Hot Off The Press
- Gold Get Well Dazzles™ by Hot Off The Press
- Gold Greetings Dazzles™ by Hot Off The Press
- Sakura Glaze Basics Pens
- White Cardstock
- Iced Spruce Distress Ink Pad
- X-acto® pen Knife
- Self-Adhesive Cutting Mat
Instructions:
- Cut a 5”x2 1/2” acetate and place the floral band-aid Dazzles™ in the center. Place the “Get Well Soon” Dazzles™ as shown. Place the acetate on a flat surface and color in each area starting with the lightest color Glaze, then adding the darker color Glaze on the outer edges. Use dark blue and black Glaze for the band-aid, red and black Glaze for the flower, dark green and dark blue Glaze for the leaves, white and red Glaze for the heart. Let dry 5 to 10 minutes.
- Place your card with the fold at the top and cover your card with Smoke suede paper.
- Use the template to trace the Vintage card on Geometrics grey hexagon paper. Trace the outer edges of the template and the inner cutout. Remove the template and cut around the outer traced edges. Ink the edges and mat on white cardstock with a 1/16” border. Glue even with the card fold.
- Open your card and place the front on your cutting mat. Cut out the inner traced area, and cut 1/4” additional from the upper edge of the cutout. Glue the acetate behind the window.
- Close your card and place border Dazzles™ around three side of the window.
- Place a length of ribbon across the card bottom, and glue the ends under the suede. Zot™ a bow at the left and place “Thinking of You” Dazzles™ on the ribbon.
- For the inside: Ink the edges of a 5 1/2”x4 1/2” Geometrics grey paper and glue in the center.
Get Well Card
Designer: Gail Booth
Presented by Sara Naumann
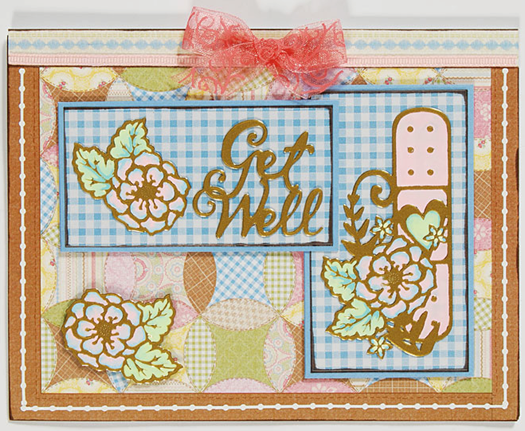
Designer Tip: When coloring on acetate, keep your work surface flat or the inks will “move” before they dry.
Supplies:
- 5”x6 1/2” Blank White Card
- Sew Cute Paper Pack by Hot Off The Press
- 1/8” wide pink grosgrain ribbon
- 1/2” wide bright pink swirl sheer ribbon
- 8x8 Happy Overlay by Hot Off The Press (or any acetate)
- Gold Get Well Dazzles™ by Hot Off The Press
- White Stitched Dazzles™ by Hot Off The Press
- Sakura Soufflé Opaque Pens
- Colonial Blue cardstock
- Dark Brown Chalk Ink Pad
- Foam Tape
Instructions:
- Place your card with the fold at the top. Cover your card with Sew Cute quilt paper, keeping the brown border at the lower left corner. Cut a 3/8”x5” Sew Cute brown border and glue even with the right edge. Ink the edges brown. Ink the edges of a 6 1/2”x3/8” Sew Cute stitched paper and glue even with the fold.
- Cut 2”x3 1/2” acetate and place the floral band-aid Dazzles™ in the center. Place the acetate on a flat surface and color in each area starting with the lightest Souffle color, then adding the darker Souffle color on the outer edges. Use pink Souffle for the band-aid, pink and blue Souffle for the flower, green and teal Souffle for the leaves and the heart. Let dry 5 to 10 minutes.
- Cut 3 1/2”x1 3/4” acetate and place a flower/leaf and “Get Well” Dazzles™ as shown. Color as shown and let dry.
- Ink the edges of 2”x3 1/2” and 3 1/2”x 1 3/4” Sew Cute blue gingham paper and mat on blue cardstock with 1/6” borders. Zot™ the acetates onto the corresponding matted papers and foam tape onto your card, as shown.
- Place a flower/leaf Dazzles™ on acetate, color as shown and let dry. Cut out 1/16” around the flower and foam tape at the lower left.
- Glue pink grosgrain along the stitched paper, trimming the edges. Zot™ a pink swirl sheer bow in the center, as shown. Place white stitched Dazzles™ around the brown border.
|