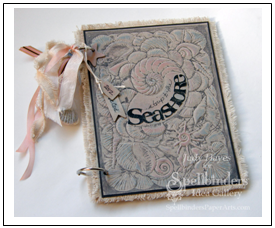
Seashore Album
by Judy Hayes
Spellbinders Supplies:
GC-001 Spellbinders® Grand Calibur® Machine
GC-003 Raspberry Spacer Plates
E3D-001 Shell Beauty 3D M-Bossabilities™
S4-399 Charmed I’m Sure
Other Supplies:
Tsukineko® / IMAGINE Crafts: Memento™ Inks - Angel Pink, Summer Sky, Espresso Truffle; Memento™ Marker - Espresso Truffle
Basic Grey: Serenade or Konnichiwa - brown letter stickers
Bazzill Basics Paper®: Java
May Arts: ¼" Pink Silk Ribbon
BEACON ADHESIVES: FABRI-TAC™ Glue
Scor-Pal: ¼" Scor-Tape™
Kraft cardstock
Natural Canvas: medium weight
Chipboard
Beige seam binding
Hemptique®: True Bamboo Crafter’s Cord
Book rings: 1 ¾"
Scrap ribbon
Small piece of square netting
Scissors
⅛" hole punch
Ruler
Mini spray bottle with water
Cereal boxboard
Small shells
Photos and memorabilia
Paper trimmer
Pencil
Instructions:
- Trim 2 pieces of chipboard to 5 ½" x 7 ½".
- Trim 7 pieces of Kraft cardstock to 5 ½" x 7 ½" (five for inside pages and 2 for covers).
- Cover one side of trimmed chipboard with trimmed cardstock.
- Place Kraft side of covers together. Using a pencil, mark for holes 1" in from top and bottom edges and ⅜" in from left edge. Punch holes with an ⅛" hole punch.
- Place pages inside covers and align. Using covers as a template, punch holes in pages. Repeat for extra pages.
- Cut or tear two 6" x 8" piece from canvas. Fray edges about ¼" as shown. Glue to outside covers with FABRI-TAC. Punch holes through canvas.
- Lightly rub Angel Pink and Summer Sky ink directly on canvas and ink edges of front cover.
- Trim a piece of Kraft cardstock to 5 ¼" x 7 ¼".
- Place Shell Beauty folder on pink embossing plate. Rub Espresso Truffle ink on recessed side of folder (side with Spellbinders logo on outside).
- Place and align trimmed cardstock on opposite side.
- Lightly mist inked side with water.
- Carefully close folder and emboss with Grand Calibur® machine.
- Open folder. With paper in place and inked side up, rub Angel Pink inkpad over large shell and other round shells. Apply Summer Sky ink to rest of shells and on recessed area of large shell. Repeat until desired look is achieved.
- Add alpha stickers to large shell and write “…a trip to the” with Memento Espresso Truffle marker.
- Trim a 5 ⅜" x 7 ⅜" piece from Java cardstock. Using Scor-Tape mount behind embossed piece.
- Fasten to album cover with Fabri-Tac Glue and punch holes.
- Thread covers and pages with book rings.
- Cut/emboss/stencil 2 matching tags from Kraft cardstock and 1 from cereal board with Charmed I’m Sure die set. With cardstock die cut still in die, apply Summer Sky ink to embossed area of one tag and Angel Pink ink to embossed area of other tag. Affix to cereal board tag. Write sentiment on both sides with Espresso Truffle marker. Repeat for second tag.
- Tie tags to book ring with cord.
- Cut/emboss/stencil 2 star tags from Kraft cardstock and one from cereal board. Apply Angel Pink ink to embossed areas through die. Adhere to cereal board star. Add star to book ring.
- Tie ribbons and torn piece of canvas to book ring.
- Place shells in center of netting. Gather ends towards center and tie with cord. Attach to book ring.
- Add photos and memorabilia to album pages.
Designer Tip:
A light misting of water on top of inked folder helps re-moisten ink and gives a deeper more detailed emboss to paper. This design can easily be adapted to a purchased 5 ½" x 7 ½" chipboard album. For a different look and feel, try other ink colors.
Your creativity is limitless - Explore Beyond™!
|