Close this window to return to series
200 project listing |
| Popping
the Question! by Julee McGuffee |
| My children and I spent many enjoyable
hours reading pop up storybooks. They always seemed to have a magical
quality, which made them so much fun. Pop up scrapbook pages have
that same magic and are so easy to make and protect. |
| Materials
Needed |
 |
| |
 |
Xyron 900 or 510 Machine |
| |
 |
Xyron 150 Create A Sticker Machine |
| |
 |
Acid Free Laminate/Adhesive Cartridge |
| |
 |
Acid Free Permanent Adhesive Cartridge |
| |
 |
Fiskars Paper Trimmer and Scoring Blade
|
| |
 |
Vellum paper |
| |
 |
Fiskars Paper Trimmer |
| |
 |
Two pieces of cardstock for background
pages |
| |
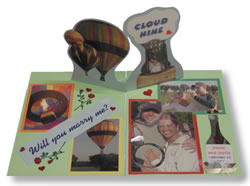
| These instructions will focus on making a pop-up page
and protecting the pop-up part rather than giving explicit instructions
for the page shown. |
| Instructions
|
| |
1. |
Assemble photographs, die cuts, etc to be used for
the pop-up part of your page. Apply adhesive to these pieces. |
| |
2. |
Replace the adhesive cartridge with the laminate/adhesive
cartridge. Arrange, then position the pop-up on the vellum paper.
Run the assembled pop up through machine to apply laminate to the
top and adhesive on the underside. Remove the waxy backing paper
then apply to a complimentary color of cardstock. Trim around (silhouette)
the pop up pieces. Set aside. |
| |
3. |
To make the pop up base, cut a strip of paper about
8.5” long and 2” wide. Replace the cutting blade with
a scoring blade in the paper trimmer then score a line lengthways
down the center of the strip. Fold the strip in half with the short
ends together. Starting 1/2” down from the fold cut a triangle
starting from the outside edges to the center of the fold at the
top. |
| |
4. |
Replace the cartridge in your Xyron machine with the
adhesive cartridge. Fold the strip in half lengthways then run through
the machine to apply adhesive to one side of the fold. Trim the
backing sheet, but do not remove at this time. Run the folded paper
through the machine again to apply adhesive to the opposite side
of the folded strip. Set aside. |
| |
5. |
To join your two background sheets together, cut a
2” wide strip from the same color of cardstock the same length
as the height of your paper. Score a line down the center of the
strip. Apply adhesive to the strip then use this strip to join the
two background sheets together. NOTE: It is necessary to leave a
tiny space between the two sheets so that they will fold together
if the joining strip is on the back. It is not necessary to do this
if the joining strip will be on the front. |
| |
6. |
Remove the backing from one side of the folded pop
up base. With the short fold at the center of the two background
papers about 3” – 4” from the top, attach the
folded pop up across the center with the ends toward the top of
the at each side forming a “V” shape. Place so that
the adhesive on the top part of the fold is facing toward the bottom
of the page. Remove the backing from the top half of the pop up
base, then attach the laminated pop up. |
| |
|
TIP:
The height of the pop up cannot exceed the distance from the pop
up base, at the center of the page to the bottom of the page. |
| Sponsor:
Xyron, Inc. |