Epson
Computer Tip:
Creating Custom Overlays |
There are many fun transparent overlays you can purchase for use
with your traditional scrapbook pages. These clear “transparencies”
can be put on top of your pages, or you can place items both below
and on top of the transparency. Did you know you can easily create
your own custom overlay in Photoshop Elements 3.0? Here’s
how:
|
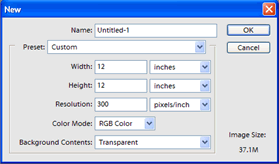
1. Open a new document in Photoshop Elements (go to File | New | Blank File) and set the size to 12 inches by 12 inches, the resolution to 300 pixels/inch, RGB color mode and a transparent background. You’ll see a checkerboard filling your file – this is PSE’s way of showing you the background is transparent. This means it won’t be printed – only the object(s) added to the file will print. |
 |
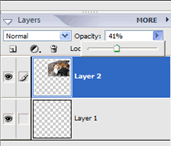
2. Next you can add photos, text, embellishments, etc. to fill the overlay however you wish. To add a file to the overlay, just open the file (go to File | Open and browse your computer for the desired file). To add the file to the overlay, just click on the Move Tool in your Tools Palette then drag the item onto the overlay. You’ll notice that the item is added as a new layer in your Layers Palette, so you can make changes to this item independently of anything else you add. |
3. If you want one of the photos or text layers to be even more transparent, you can change the opacity of that layer in the Layers palette to the left of the workspace. Click on the layer to alter it and then slide the Opacity slider to the desired transparency. |
 |
4. Color photos work well for this technique, especially if they are going to be overlaid on a textured cardstock. |
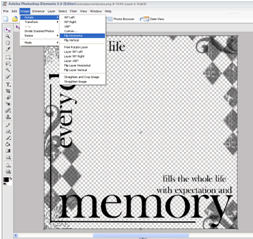
5. Once the overlay is complete, it needs to be reversed before it is printed because the transparency has to be printed on the back, or tacky, side of the material. This is done by selecting Image | Rotate | Flip Horizontal.
6. On our Epson printers, you can print using normal plain paper settings. The settings may need to be altered depending on what printer you use. |
 |
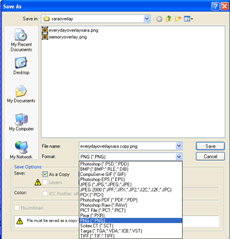
7. If you want to save the file, it MUST be saved as a .png file, which saves the transparency of the background. Just choose File | Save As and then choose .png as your file type. |
 |
| Examples: |
 |
You can also layer these files digitally – this is the only way to get the effect shown below, which is white ink printed over the top of the layout! It’s actually just the absence of color, so the color of the paper shows through. But since no printer prints with white ink, the only way to get this effect is digitally! |
 |
| Sponsor:
Epson America, Inc. |
|