Epson
Computer Tip:
Creating Digital Torn Edges |
You can mimic the look of torn paper in Photoshop Elements with
just a few quick steps! |
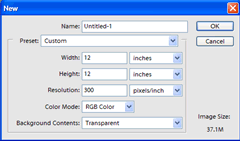
| 1. Start with a new file with a transparent background (go to File | New | Blank File and choose your paper size – here we’ve chosen 12x12 – and set your Resolution to 300, your Color Mode to RGB Color and your Background to Transparent). |
 |
| 2. To fill this layer with the foreground color, click on the Paint Bucket Tool in your Tool Palette and then click on your new file. (You can also digitally tear paper that you have already created -- just drag it on top of your new file). |
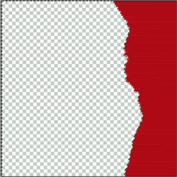
| 3. Using the Lasso Tool, create a jagged edge along one side of your paper – this is one case where it’s good to have a shaky hand! Set your Feather to 2, and make sure anti-aliased is checked. When you’ve created the jagged edge, make sure you go outside the edge of your file to wrap around back to your starting point. Once you have selected the area that you want to “tear” off, press Delete. |
 |
 |
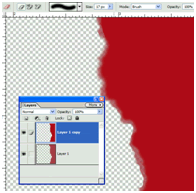
4. Duplicate this layer by dragging it up to the new layer icon in the layers palette. Temporarily hide the top layer by clicking on the eyeball next to the layer.
5. Select the bottom layer in the layers palette, type Ctrl + U and adjust the lightness and saturation of this layer. In this example, we slightly decreased the saturation and increased the lightness. You may also want to decrease the opacity of the layer, and add some noise by going to Filter | Noise | Add Noise. |
| 6. Click on the eyeball next to the top layer in the layers palette to view the top layer again. Select the Eraser Tool (a soft round brush was used in this example) and, again with a shaky hand, erase close to the torn edge so that the bottom layer shows through (you may want to zoom in a bit). You don’t want to erase evenly along the edge – erase more in some spots and less in others for a realistic effect. |
 |
7. Merge the layers by going to Layers | Merge Down. Now add a drop shadow in the Styles and Effects Palette. You may need to adjust the angle of light and the distance by clicking on the “f” in a circle next to the name of this layer.
8. Save this new file as a .png file to preserve the transparent background, and then drag and drop onto any layout!
Examples: |
 |
| Sponsor:
Epson America, Inc. |
|